So Meta – Sweater Edition

This post is a bit later than I wanted, but I’m blaming Portland, OR since that’s where I was when I finished this project.

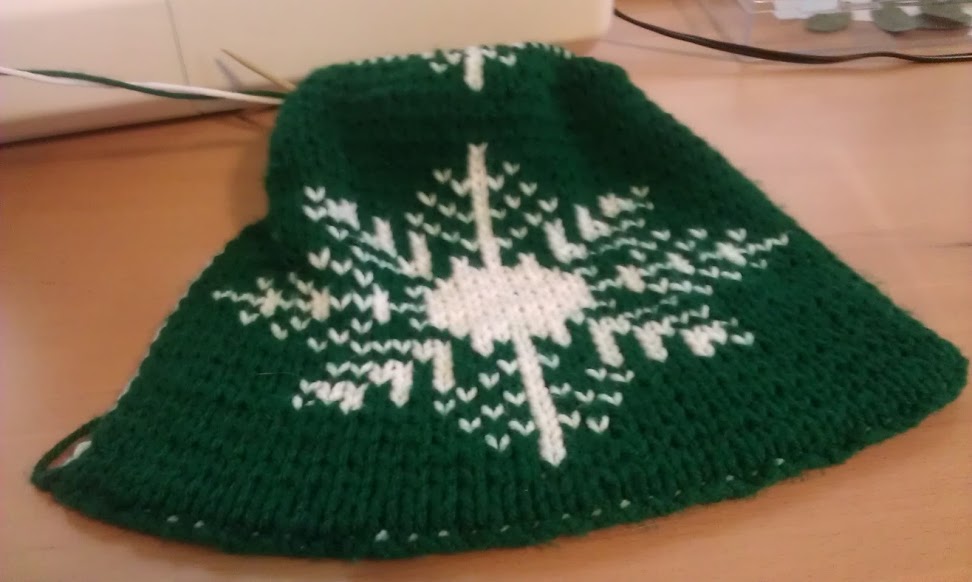
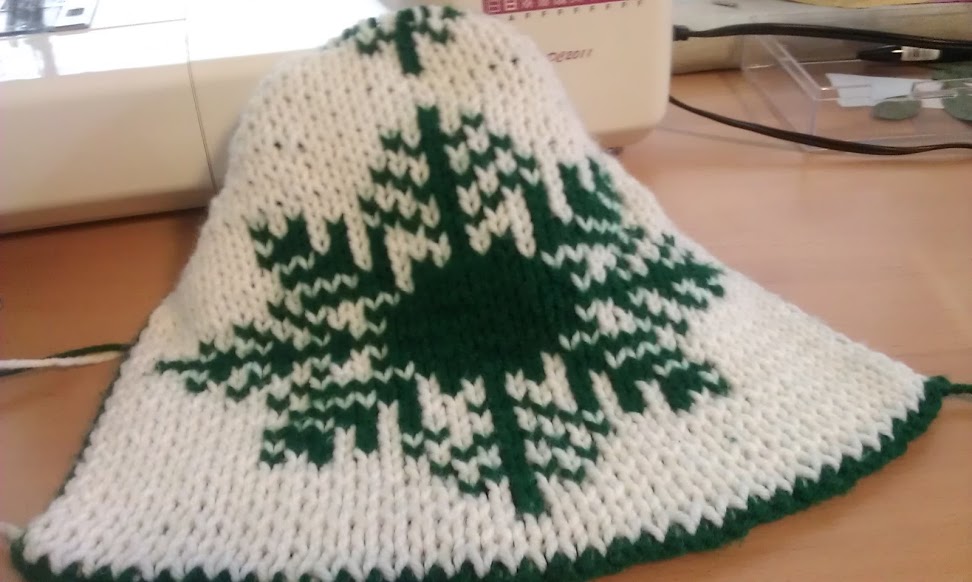
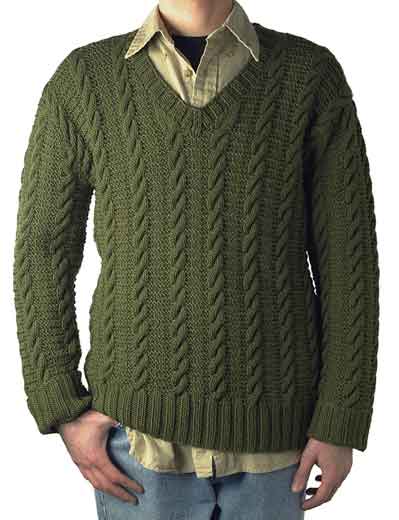
So this year I decided it was time to try some more advanced knittings… things that aren’t flat or simple socks/hats were high on my list.  Things like, a sweater for Ben and one for myself. So naturally I went looking for a sweater design for Ben that I felt would be challenging yet within my skill basis and lo and behold…. it was named Ben.

That’s right… I knit a Ben for my Ben so he can be Ben in his Ben.   And I took pictures today (using a phone owned by Ben no less):

Yo Dawg!  I  heard you like Ben!

Yo Dawg! I heard you like Ben!

Now part way through this sweater knitting plan I had heard there was some sort of sweater knitting curse in which a person knitting for their significant other before they are wed would end the relationship before the sweater was done.  I unwisely laughed at this with Ben and from that point he kind of approached the whole sweater project with some trepidation… but I’m happy to report, we survived the sweater curse!

IMG_20130308_095810

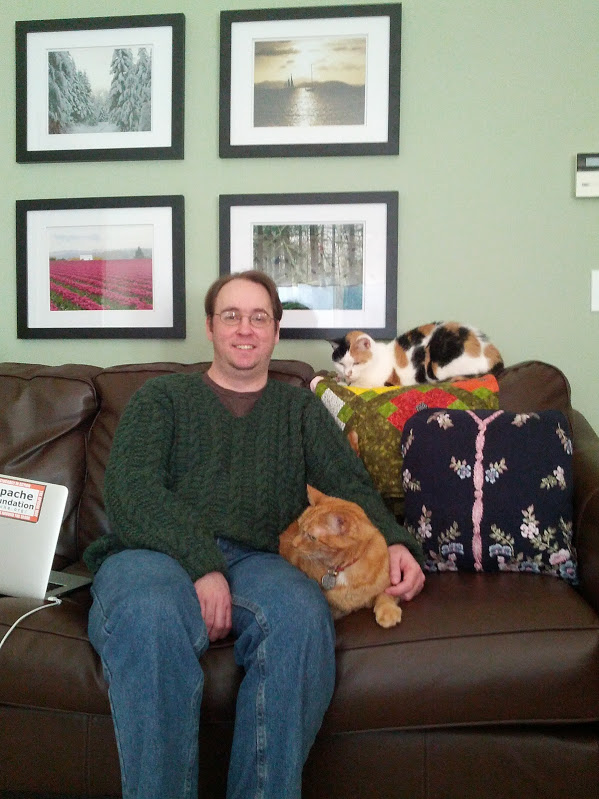
So here’s a Ben in a Ben taken on a phone owned by Ben, in front of photos taken by Ben.

The sleeves are a bit long if you dont’ roll the cuffs, but they are symmetrical and it does fit.

So next up… I’m deciding which sweater I want to knit for myself.

Its Curtains for you, January! & January Project bag(s) round up

Ok so first things first….. as I mentioned in my What to expect in 2013 post, I am working on a master bedroom star quilt.  What I didn’t mention, was that this was a small part of a redecorating of the master bedroom… I managed to repaint it the aptly named, Restful (seriously… its a green).  This month… I tackled the curtains.  I was inspired by this fabric:

Nifty birds and branches!

Nifty birds and branches!

Which I then designed my own…. and used my left over quilt materials for my birds!  Which I just finished up today:

IMAG0973

And here they are!  (Note how restful my walls look! ^.~)

Earlier but better photo of my take

Earlier but better photo of my version.  

So I’m pretty pleased with myself about those.  They did take a bit more time than I anticipated, but there is quite a bit of detail work in there.  So its curtains for my curtains project!

And now for the second bit of the title…..

You know those various tote bags.. the cute ones with bugs that you receive as gifts, and the logo splashed freebies… I have a whole collection of those that I consider my project bags.   And its a good thing I have a decent collection…..

So first off… I made my own handbag this month!

Being modeled by my new dress form no less!

Being modeled by my new dress form no less!

The pattern is called Brea.  It came together rather quickly and personally I thought was a good use of some of my Chinese Yarn I purchased from Goodwill.  (That link is to the label, if you translate it let me know!)  I still have a few more balls of the brown, as well as some pale spring green and pale lilac.

I haven’t gotten terribly far on my double knit snowflake scarf project:

Green Side

Green Side

White side

White side

Double knitting seems rather interesting, but one of those things where you defiantly need to keep your mind on what you are doing, so it does tend to get set aside.

I mostly have this cross stitch done from a kit I picked up ages ago… I just need to tackle the backstitches and the french knots.  Its my first project using black aida cloth.

Four cute little Chickadees.

Four cute little Chickadees.

FINALLY…. I said I wanted to tackle a pair of sweaters this year and… not only did I finally pick out and order my yarn for the Ben sweater….

Future sweater in the raw.

Future sweater in the raw.

I’ve cast on and managed to work bout 12 inches of the back!  (This includes the 4 rows I had to pull out and redo last night from the evening before… -.-)

I'm now even further along, but will I finish it before winter finishes?

I’m now even further along, but will I finish it before  the end of winter?

(Lastly… if you have been eyeballing any of the remaining stockings… Please note that the coupons have been disabled, but the prices have dropped significantly if you are looking for a sweetheart gift in February!)

If A Bird in the Hand is worth 2 in the Bush, How much for 14 birds in the hand?

So last Christmas when I wrapped up Debora, I tied on my tiny version of the Bird in a Tree bird.  I’d made up one per the directions and he was very cute… but in the spirit of wondering if one could knit something up in size 5 embroidery floss I knit up the small version.

Full size and original tiny red bird for comparison.

Full size and original tiny red bird for comparison.

Tiny red was very cute, and the seed beads worked pretty nicely for eyes, which spared me the french knots… which is one of my least favorite embroidery stitches.  Red bird was a bit of a success… and so I accepted the challenge of knitting over a dozen more… which leads us back to… 14 birds in the hand:

The rough equivalent of 28 bush birds.... which isn't even the record for Pine Siskins at my feeder this past spring.

The rough equivalent of 28 in the bush birds…. which isn’t even the record for Pine Siskins at my feeder this past spring.

All of these birds were knit up on some of my smallest double pointed needles from a multipack of what I thought I might need at some point doing lacy socks or something.  Which I believe is the size 00 needles.  All I know is the whole time I was knitting I was worried I would end up bending them into new and unusual shapes. (Which only happened that one time!)  The floss was ok, but didn’t have much give, so if you dropped a stitch or messed up, it was pretty much a frog and redo process.

Now… in case you were wondering how small these guys REALLY are…

That's a US nickel for size comparison

That’s a US nickel for size comparison

Egg Cartons - aka Bird Organizers

Egg Cartons – aka Bird Organizers


What to expect in 2013

Well last year I set myself the goal of one Christmas stocking a month from January to October and it went pretty well.  I sold a few of the stockings, and hopefully someone will take advantage of this coupon code “InWithTheNew” and save themselves 25% on those I have left in the etsy shop!

So this year  I thought it might be good to set myself some of those crafty goals again… so here’s what I know I want to do in 2013:

I’ve accepted a commission on 18 itty bitty red birds for one of my aunts Christmas Trees.  The pattern is available on ravelry, my only difference is that instead of yarn I used size 5 DMC floss on what I think are my size 00 knitting needles (I swear I thought I was going to bend those things as I was going along!)

This tree soon to be populated with a flock of red birds

This tree soon to be populated with a flock of red birds

I’d also like to tackle my first sweaters.  I want to make one for myself and one for Ben.  For him, I’ve picked out my pattern… and its aptly named… Ben!

I'm gonna make a Ben for my Ben so he can Ben in his Ben!

I’m gonna make a Ben for my Ben so he can be Ben in his Ben!

On the Quilting front, I’ve picked fabric and cut for my first square on the grand King sized Quilt I want to make for our bed:

I picked up a couple of these Jelly Rolls at the Labor Day Sale and then did the math on downscaling some star blocks to fit the roll cuts

I picked up a couple of these Jelly Rolls at the Labor Day Sale and then did the math on downscaling some star blocks to fit the roll cuts

This is my first Block cut and just starting to piece.

This is my first Block cut and just starting to piece.

Because its going to be so big, my plan is to piece it and then take a class and quilt it on a long arm machine at one of the local(ish) quilt shops!   If you want to follow along, just as in prior cases… there is an album started for this one.

And lastly, but certainly not least… I want to start making gloves and mittens in a similar style to last years stockings.   Which means lots of fiddling until I find what works best in that arena.

So… Wish me luck!

Meet Debora; My First Pattern

So a bit ago I made a shawl, and each section started as partial cast on and partial picked up stitches.

I started out so afraid of cutting up my yarn....

I started out so afraid of cutting up my yarn….

Then I migrated to the 3 leaf counterpane, where every pane was a separate piece that had to later be joined together.  Its also one on which I fiddled with the pattern slightly, and only had enough yarn to make a 9 pane piece.

Conquering my fear of joining pieces together!

Conquering my fear of joining pieces together!

And today… I’m finally presenting my very first counterpane pattern, which I am naming after a very important person in my life, my aunt Debora.

The Debora Counterpane

The Debora Counterpane

This was an interesting experience as I pulled out and restarted the original pane several times until I found something that combined the elements I wanted.  On the second pane, I documented each rows stitches as I attempted to recreate my work.  Then for panes 3 through 16 it was stitching from the pattern and adjusting the notes so that they made sense to someone other than myself!  For this 16 pane blanket, which was gifted to my aunt Debora, it took roughly 10 skeins of Cascade Superwash DK weight.

A Closer view of the pane joined at the leaf points.

A Closer view of the pane joined at the leaf points.

And a view of the panes joined at the lace points

And a view of the panes joined at the lace points

If you would like this pattern, you can get it from the patterns page (linked above) or here: DeboraCounterpane (PDF file)

This pattern is freely available, but if you enjoy it and feel so compelled, my aunt Debora and I would be pleased if you would give a donation to the American Cancer Society.


Christmas Kitchen Gifts to Give

Giving homemade gifts is one of those things that you either pull off with amazing confidence or immense trepidation.  For me its usually trepidation.  I’m very aware of the gold macaroni effect that some homemade gifts carry with them.  So braving all that and casting into the ether of “well if they don’t like it they can use it as oil rags!” I present some Christmasy Kitchen gifts  (I’ve already gifted these, so its safe to share!):

One set was 2 quilted Hot Pads, A knit dishtowel, dishcloth and scrubby

One set consisted of  2 quilted Hot Pads, A knit dishtowel, dishcloth and scrubby

Every item was different, and the knit items are simple knits done in Christmas colored cotton yarn.  I used King Charles Brocade , Double Seed StitchBasketweave Stitch, Grandmother’s Favorite Dishcloth, and just a pure garter stitch for patterns.   To make the scrubbies, cut a roughly 1 inch strip of tulle (and just eyeball it…. you won’t notice any imperfections.  My strips always turn out looking like they were cut by a 5 year old hopped up on espresso.) and knit as a second strand with your regular knit pattern.

My hot pads were all test quilt blocks, a 6 inch block and an 8 inch block.  In the photo above the smaller is a traditional 9 patch and a disappearing 4 patch block, both of these I just used stitch in the ditch method.

An Old Maids Rambler and a more traditional Four Patch Set

An Old Maids Rambler and a more traditional Four Patch Set.  The Rambler is just stitch in the ditch, the Four Patch has echo quilting on the larger bird solids, and diagonal on the smaller four patches.

IMAG0860

A9 patch with just 2 fabric colors, and a Variable Star.  I used echo quilting on the interior of the star, and quilted through the diagonals of the lighter fabric on the smaller square.

Each of my sets were joined by identical fabric choices for the backs.  I used two layers of batting and bound them by folding the larger backing material twice over to the front.  To get the mitered style corners, fold the corner in at a 90 degree angle before you fold in the sides.

Now I also included several batches of cookies, and tied my gift bags with some ornament seed cakes.  I got the seedcake recipe from this instructable that was designed for making a seed wreath.

My seed cake ornaments with their hanging loops.

My seed cake ornaments with their hanging loops.

What I did differently is that I used my cookie cutters, covered on one end with tinfoil as my molds.  I actually had a few more than these, specifically some snowflakes, but they were a bit fragile and didn’t make it, either from the removal from the cutters or from my attempts to add hanging holes.  So I’d suggest either pre-stringing your cakes, OR use a heavy nail as a hole making form within your seedcakes when you are forming them.   They are safe for feeding the birds, or you can use them on your tree!

Christmas Stockings are now on Sale!

Well here we are at the part two of my New Years Resolution…. I have all my stockings crafted… now time to sell them off (I sincerely hope!)

They are all for sale at my etsy shop here:  http://www.etsy.com/shop/MissCarlotta  minus one already claimed Zelda stocking.

Feel Free give me any feedback on my pricing/photography skills/etc!  And for those that refuse to click links here’s a gallery of all my stockings I knit this year that are up in the shop.

This slideshow requires JavaScript.

You can also find links to both my shops on the right.  Now that you are wondering why I have two shops… well its because of readership.  WePay doesn’t charge me to list items only for sales, but the traffic is much smaller.  Etsy does charge me to list items, but there are slightly greater odds that someone will see the shop that maybe hasn’t been to my website.

Did I give you this hat? (& first mittens)

Today I took a break from house work and finished up a Christmas gift and finished the second of my first pair of mittens.  I’ve known since I found the pattern just what yarn I wanted to use to try out making mittens.  It was this sage and white that would be kind on me, and was a nice soft wear.  I’d had the ball saved up for awhile… from when I made this hat and was learning about cabling and decreases:

A Beanie or Tuque… depending on where you live.

Now I know I gave someone I know this hat… but for the life of me I can’t remember whom specifically, it was either Calvin, or Al, or Mary or Dad.  So if any of you are reading this…. I have some mittens!

Kittenless Mittens

Now, to start with I didn’t find dpns in size 4 at the local hardware shop… (yes I live in a town of the size and age where you can purchase knitting needles from the hardware store) so I did pick up some size 3, which is slightly smaller and knit the smallest size.  Turns out… These mittens seem a bit bigger in a few places so my next pair will need a different pattern… ah well! But they do have the advantage of being ambidextrous.

At some point some enterprising homemaker devised the one fool proof method for ensuring that a kid wouldn’t ever lose their mittens.   No it wasn’t the elastic with clips on both ends, that turn frigid cold and packed with snow at the most inconvenient of times.  It was the long rope cord connecting mitten A to mitten B.

Almost as old as that, is the pattern I used to make my first mittens.  Apparently this is a pattern from Eleanor Roosevelt’s knitting patterns, and you can find it at knitty.com. 

Anyway… if I did give you that hat and you’d like the mittens, let me know.  And if you want a cord linking your mittens together… I have just a little bit more of that yarn!

September: So much to do…. how about some leaves and berries?

So September has just flown by, and unfortunately the memory card to the good camera is having issues and so I need to get a new one… so this means rather poor quality photos this post.

My design this month was more traditional in nature although the implementation felt a little masochistic… which sometimes family holidays are that way aren’t they?

Leaves and Berries

I started with an attempt at a three color braided by cabling look for my cuff, and ended with a braided hanging loop.  Braiding is not a problem… but working three skeins of yarn and remember which is cable over and cable under and how to space.. that was a bit of gymnastics:

Cuff and hanging loop… they look similar but are done very differently.

When I got down to the heel I thought how nice it was to bring those colors back down the sock a bit more… so I went with a heel of alternating red and green.  This wasn’t too bad at all in my opinion, though it was a bit interesting as I started to turn the heel.

Heel detail.

And I finished it off with my new favorite thing to knit… some leaves with some berries.  Leaves are surprisingly easy to do, and while I did flirt with trying to make some more holly shaped leaves, or a wreath of leaves, I didn’t feel like this was the best project for them.  (So now I have some pre-knit spare leaves in my yarn stash.)

Leaves and berries!

I can’t say as I’m super thrilled with this one, but it is a whole stocking and it was a bit more to learn and try than some of the others so I’m putting it in the win column.

What you haven’t seen is a nearly complete third quilt, which will be a gift…. a cross stitch gift I have about 1/2 done… and my counterpane project I am designing and building. I am now on pane #3.  The first pane took quite some time as I was designing, the second pane I was writing out the pattern and now I’m knitting from the pattern to make sure I got it right.

I am also slowly but surely working on getting my etsy shop ready for a relauch with all these stockings.  After all something needs to feed my yarn habit!

Shawl we get this over with? – And some philosophy

So you know that shawl I posted from my stash just the other day… well yesterday and this  morning… I finished it!

Fanned out and on display

This shawl has been in my stash for a very long time… it had two of the half fans that form the top border on stitch holders and just hanging out because I ran out of yarn.  It was the first modular design piece I decided to try.  Since it was a learn to do it project… I used stash yarn that I picked up… likely from the clearance section of the yarn shop, and didn’t have enough as it turns out.  So I ended up finishing it with a later not-quite match.

Here you can see where the new color row fits in with the old color

Now…. the philosophy ramble…. (skip to the end if you want the pattern link).

I don’t tend to worry about gauges when I’m testing out something to see if I can do it.  I don’t plan nearly as much as I probably should… but since I am in more of the beginner stage of knitting, I don’t think that is a bad thing.  I could see where this would be an issue later on when I want to make a sweater, or to get the right fit on socks and gloves, but for learning the principals of stitches and patterns on scarves and blankets  it really doesn’t matter.  If what I want to know is… can I figure out how to SSK/cable/double-knit something… it does not bother me in the slightest if its 30 inches instead of 36, or vise-versa.  No one else but me has any idea how its supposed to turn out anyway.

Sure, I could follow the recommended yarn brand, which would have cost me about $60, and it would probably be worth it… but the whole time I’d have started the project I’d be fretting about cutting up that beautiful and expensive yarn.  Or I can test out a pattern and not worry about the yarn for about $10 on the same project.

If you are learning and you see a pattern you like and want to try, don’t fret over having “Super-silk-cashmere-yarn-of-Amazeballs™” just bust open your yarn stash and get to work with what you have!  Learn something new… and find what you love.

And with that… here’s the pattern.