Mario vs. Piranha Plant in the QAL

May has been one of those months where you feel like you are getting everything and nothing done all at the same time.   I have completed a lovely shawl I am saving for a later update, worked a bit on another shawl that is a gift (no update yet), started yet another pair of socks, and even did a wee bit of gardening, such as adding my flagstones to my side yard path.

My porch is just to the left.  I've spent a wee bit of time out there enjoying the flowers while knitting a bit this month too.

My porch is just to the left. I’ve spent a wee bit of time out there enjoying the flowers while knitting a bit this month too.

And so yesterday I finally got around to working on my Quilt-Along Mario Block… so I doubled down and did two.  (Also because when reviewing my plans at the end of last month I realized I might actually want to do more than 12 blocks. I finally got around to Mario.

Itsa me! Mario!

Itsa me! Mario!

My Mario was actually done in two pieces because the 820 Quilter’s Grid is wide enough that you can get one and a half blocks per section.  Since I only bought 10 yards at the start, I decided it was time to see how difficult it will be to work out the extra squares or if I would need to buy more interfacing.  And it looks like it came out ok.

I also tackled a Piranha Plant!

Nom Nom Nom

Nom Nom Nom

This is a version from the QAL group and replaces the bare warp pipe in the original Quilt design set. btw, both of the blues in the above squares are the same, its just a matter of lighting and cell phone photos.

Life is all a Work in Progress…. Here’s some of mine.

I don’t know about anyone else, but for me, sometimes I get lots of things all going at the same time and when I take just a second to breathe its all a bit overwhelming.  When I’m focused in on a single project then its easy to just keep right on going, like some puzzle where you just put in one more piece… “just one more block” so you can finally realize the big picture.

So on the one hand, when you have multiple projects going, doing a Quilt-A-Long(QAL) is a bit helpful, since you can focus on just one block and then you know that the object is to just do one a month so you’d best stop. Leaving the next block for next month is what you are supposed to do, and not just sitting there taunting you.

So first up… my QAL block for April is Luigi.

Issa' Luigi!

Issa’ Luigi!

I personally like Luigi better than Mario.  I don’t know why… maybe its second child/second player related… but if you make me choose, I want Luigi.  So my quilt means… Luigi gets completed first.  I did assemble him facing left, whereas the original pattern has him facing right.  But I like the variety of not having all my characters facing one direction.

I have also managed to push out more star blocks, and am now up to 33 stars.

This does mean I’ve managed to complete one of every different fabric type.  I’ve started to make them a bit more assembly line style, which does help with feeling productive and actually getting them done.  I tend to make from four to six all at the same time.  Hopefully I can keep on track and get all my stars complete this year.

Lastly…. I made a small test block for someone online, and they gifted me with a charm pack of beautiful autumn colored batiks.  (A Charm pack is 40 5 inch by 5 inch squares)  When I saw it my first thought was autumn leaves, so I set out to find a quilt block.  I finally settled on a Tree of Life Block with each of my batiks as leaves on my trees.  So I fiddled about with my paper and pen until I arrived at what I think is a solution.  Then the next time I was out, I bought some background and Tree trunks to go with my leaves and now I have it all ready and waiting for the first cut.

Spring Sunshine on an Autumn Quilt.

Spring Sunshine on an Autumn Quilt.

Not shown here today is my movie strip quilt that is hibernating awaiting more photos, my Christmas Cathedral Window I want to use up Christmas Fabric Scraps on, the Kandinsky Art Quilt I’m still working on plotting circles for, or the Star Trek Disappearing (Space) Nine Patch that I need to buy the solids to go with my prints.

Ah well… they will all get finished eventually, right?

The Sequel to Socks

Way back in April of 2010, I made my first pair of socks. They were rather boring beginner simple socks; long ribbed cuff and plain stockinette stitch feet.  I didn’t really understand about gauge and seaming so they didn’t fit me very well and so the first sock was an experience, and the second sock was… a chore.  This is apparently a pretty common issue with socks.  Common enough they call it Second Sock Syndrome.

In 2012, I actually spent the whole year knitting Christmas Stockings.  This safely avoided the problem because this meant there was only ever ONE of a sock.

But I’d see some absolutely stunning looking socks people would make, and I’d have this internal debate on if I dare try socks again.  Well… reddit knitters do monthly knit-a-longs, and for the month of April… it was socks.  So I jumped in with two feet!

I knit these two at a time from the toe up.  And when I tried to explain the method to the non-knitter Ben he looked at me like I was a witch.  (Think Monty Python “She’s a Witch!” not Salem Witch Trials)  So I’ll try to explain and if it doesn’t make any sense to you either, you can just skip ahead to more photos.

Basically you have two needles (circular or double pointed) with your sock toe stitches split so that your top/front of your socks is on one needle and the back/bottom of your socks in on the other needle. If you are using double point needles you’d need a third needle for working, if you are using circulars then you just need two with decent length.  It may help to have two of differing colors or materials so that you always knit back onto the same circular you are knitting off of and don’t grab the wrong needle.

Two Toes on Two Needles

Two Toes on Two Needles

So in the photo above let’s say that’s Sock A on the Left and Sock B on the right and my yarn is at the right sides of the socks.  I’d first knit the front of Sock B (right)  Then set that yarn (Sock B Working yarn) aside and pick up the other yarn (sock A working yarn) and knit the front of sock A (left).  Then you turn the work so you can work the backside of your socks.  Since you turned your work over, now Sock A is on the right, and Sock B is on the left.  Work the backside of Sock A, swap back to the B sock yarn, then knit the Backside of Sock B.  Turn your work and you are back at the beginning of the process, ready to knit the fronts again.

So you have two yarns going to your needles, each for its own sock, which are growing out from some toes.

Toe-taly Awesome Two at a Time

I’m Toe-tally over Second Sock Syndrome 

Now there are a few ways people go about their two at a times.  Some people work one sock per ball and have two balls of yarn either store bought OR people divide their yarn by weight.  And then there is how I did it…. I wound my hank of yarn into a center pull ball  (Using my ball winder I got with Christmas money!) and did one sock from the yarn at the center, and one sock from the yarn around the outside.   I decided to go that route because my yarn was a recycled yarn of which I had 340 yards and I do not own a scale. The pattern itself was calling for 350 to 400 yards so I was a bit nervous I might have to make my socks a wee bit short, which was another vote for doing my socks two at a time.

I am rather pleased to report that these second set of socks came out just fine, at mid calf length with plenty of yarn left.

And while I am reporting on things… I did need to stop at a yarn shop for needles, so I managed to get out to Serial Knitters in Kirkland, WA and they were very helpful and it looked like they have a nice selection.  They offered me needles in Nickel plated or Brass and quite frankly I had to ask what the difference is.  Nickel plated is a very smooth and slick option.  The Brass has a bit more grip, but smoother than the wood or bamboo I’ve used.  I think, but I can’t seem to find a link that specifically mentions it that the reason the Brass grips a bit more has to do with the tarnish it picks up from the oils in your hands.

How to Invoke the Fairies, and my Beautiful Brioche Shawl

First of all…. I need to tell you I finished my  Brioche 2 color shawl that I posted the yarn for earlier…. and its so nice I’m going to give it a proper size photo.

Just like my climbing Hydrangea... its wearing the colors of both Spring and Fall leaves.

Just like my climbing Hydrangea… its wearing the colors of both Spring and Fall.

This is a pattern I fell completely in love with when I first saw it called Under Dutch Skies.  I decided that I would need to learn to brioche, just so I could make one of my own.   I started it towards the end of the Ravellnic Games with the hopes I might complete it.  But as the deadline got closer and closer I started to push myself and made more mistakes… primarily with my leaf spine counts.

As you can see here, in rows prior I did my increase in the wrong spine  instead of the center.

As you can see here, in rows prior I did my increase in the wrong right side stitch instead of the center stitch.

Once you’ve made that mistake well… its not one I was able to tick back and then work up correctly so thank goodness for lifelines, but it still meant frogging several rows.  I wasn’t going to make it to seven leaf repeats in time to finish… so it was finally time to take a real break and get the shawl out of my head for awhile.  This also freed me to make an additional leaf repeat.  I was so excited when I got to the binding off.

I realized as I was laying it out to block, that I’d made a mistake earlier on, and I’d just never found it.  Now here’s the thing about knitting mistakes.  They are kind of like looking at yourself.  When you look at yourself and your own knitting you find all the things you wish were better.  Maybe we wish we were thinner, or maybe we wish our hair looked better or that there is less of it in some places and more of it in others, and we can get focused in on all the things that aren’t just right. (My stitches are uneven, I twisted that one stitch wrong, etc) But when you take a step back and you look at the whole picture like someone else does…. both you and your knitting are so much better than you think.

So I’ve given you hints now go right ahead… find my mistake.

Not so obvious until you find it....

Not so obvious until you find it….  Feel free to click on the photo until you get it in a larger size too!

Now the reason for that whole exercise is that sometimes when we gift or sell our handcrafted items we feel this compulsion to point out those mistakes.  There is no need.  Its a gorgeous thing worth of praise WITH its minor imperfections.

Now perhaps you have some eagle eye friends and family or over time they find its special unique “feature” and feel compelled to point them out to you.   You can respond to this in a few ways, but here’s my favorite two.

  1. This is an identification feature.  It proves that this item is unique and should it be lost or stolen you could correctly identify yours, even if someone else made the same item with the same yarn.
  2. Invoke the fairies.


That’s right… invoke the fairies by looking that person straight in the eye and letting them know that you had to leave a mistake in the item.  Fairies like to steal and take things that are perfect, and after all this friend/family member was already so incredible you felt that if you gave them an absolutely perfect knit item, the fairies might feel compelled to take them away.  (Thus making your imperfection into a very high compliment!) 

Catching up on my Quilting Along

This one is just a short update to catch you up on my catching up to the Quilt-A-Long I’m doing.

I managed to get the ? Block Block done.

Is it a coin?  Is is a mushroom?   Let's bash our head into it and find out!

Is it a coin? Is is a mushroom?
Let’s bash our head into it and find out!

And then to change it up… I did a Goomba!

Goombas are Dance Dance Revolution Champions!

Goombas are Dance Dance Revolution Champions!

This block reminded me about the younger days of the internet, when there were a large number of people making small animated gifs to append to their signature lines called blinkies.  (There were also “dolls”)

I totally made some back in the day too!

Bad to Worse and Back Again!

I know I mentioned in my last post a teaser about a knit project, but for reasons that will be explained later (real later not end of post later) I needed a break, and so I am going to skip back a bit to follow up on an item from The Good, The Bad and The Brioche.

You may recall my commentary on how I bought the wrong interfacing and was attempting to forge ahead anyway with my Mario Mushroom quilt along block.  Well I did get my first seam in… the one where I was joining together the two bits with interfacing to make one giant square.  And then THIS happened:

Do you think it gives more or less life if its been sliced, diced or julienned?

Do you think it gives more life or less life once its been cubed, sliced, diced or julienned?

So clearly my prior plans were not going to work and so I paused my quilting game and ordered one of the recommended interfaces instead.  I ordered online as its never enjoyable to drive 30 minutes just to see if they have what you need.  First there was an issue with the order amount, then there was snow in Georgia that delayed the order but eventually I did get at least a good portion of my interfacing.

So I carefully laid out all my small squares (they are 1 1/2 inches) onto the new interfacing.  Bonus being that this new kind was wide enough for a whole block of them!  And then you iron them down.. and begin the seams.  I started with the horizontal.

Twilight Zone now controls the horizontal.

We will control the horizontal.

Now I did find a couple places near the edge where I didn’t do as good of job with my ironing where the squares came loose, but that’s my own user error and I can fix that going forward.

Next you start seaming the Verticals.

...and the verticals.

We will control the vertical.

And eventually you end up with one 18 inch square Mario Mushroom pixel block.

Its a me, Mario!

Until next time on… the Quilter Limits!

One thing I really like about this method is that all the seams line up just so nicely!  I only wish I didn’t feel like I was 2 months behind on the Quilt-A-Long Project.

Let the Games Begin!… and then End!

If you are a knitter with Olympic fever you may have heard of the Ravellenic Games.  If not, well then here’s the scoop.  During the Olympics, there is a group over on Ravelry, that encourages you to challenge yourself and knit during the time of the Olympics.  Apparently there may be pixel medals involved.  (You can see all the projects here.)

So in an effort to be a bit more involved in the social nature of crafting, I thought I’d take up the challenge.

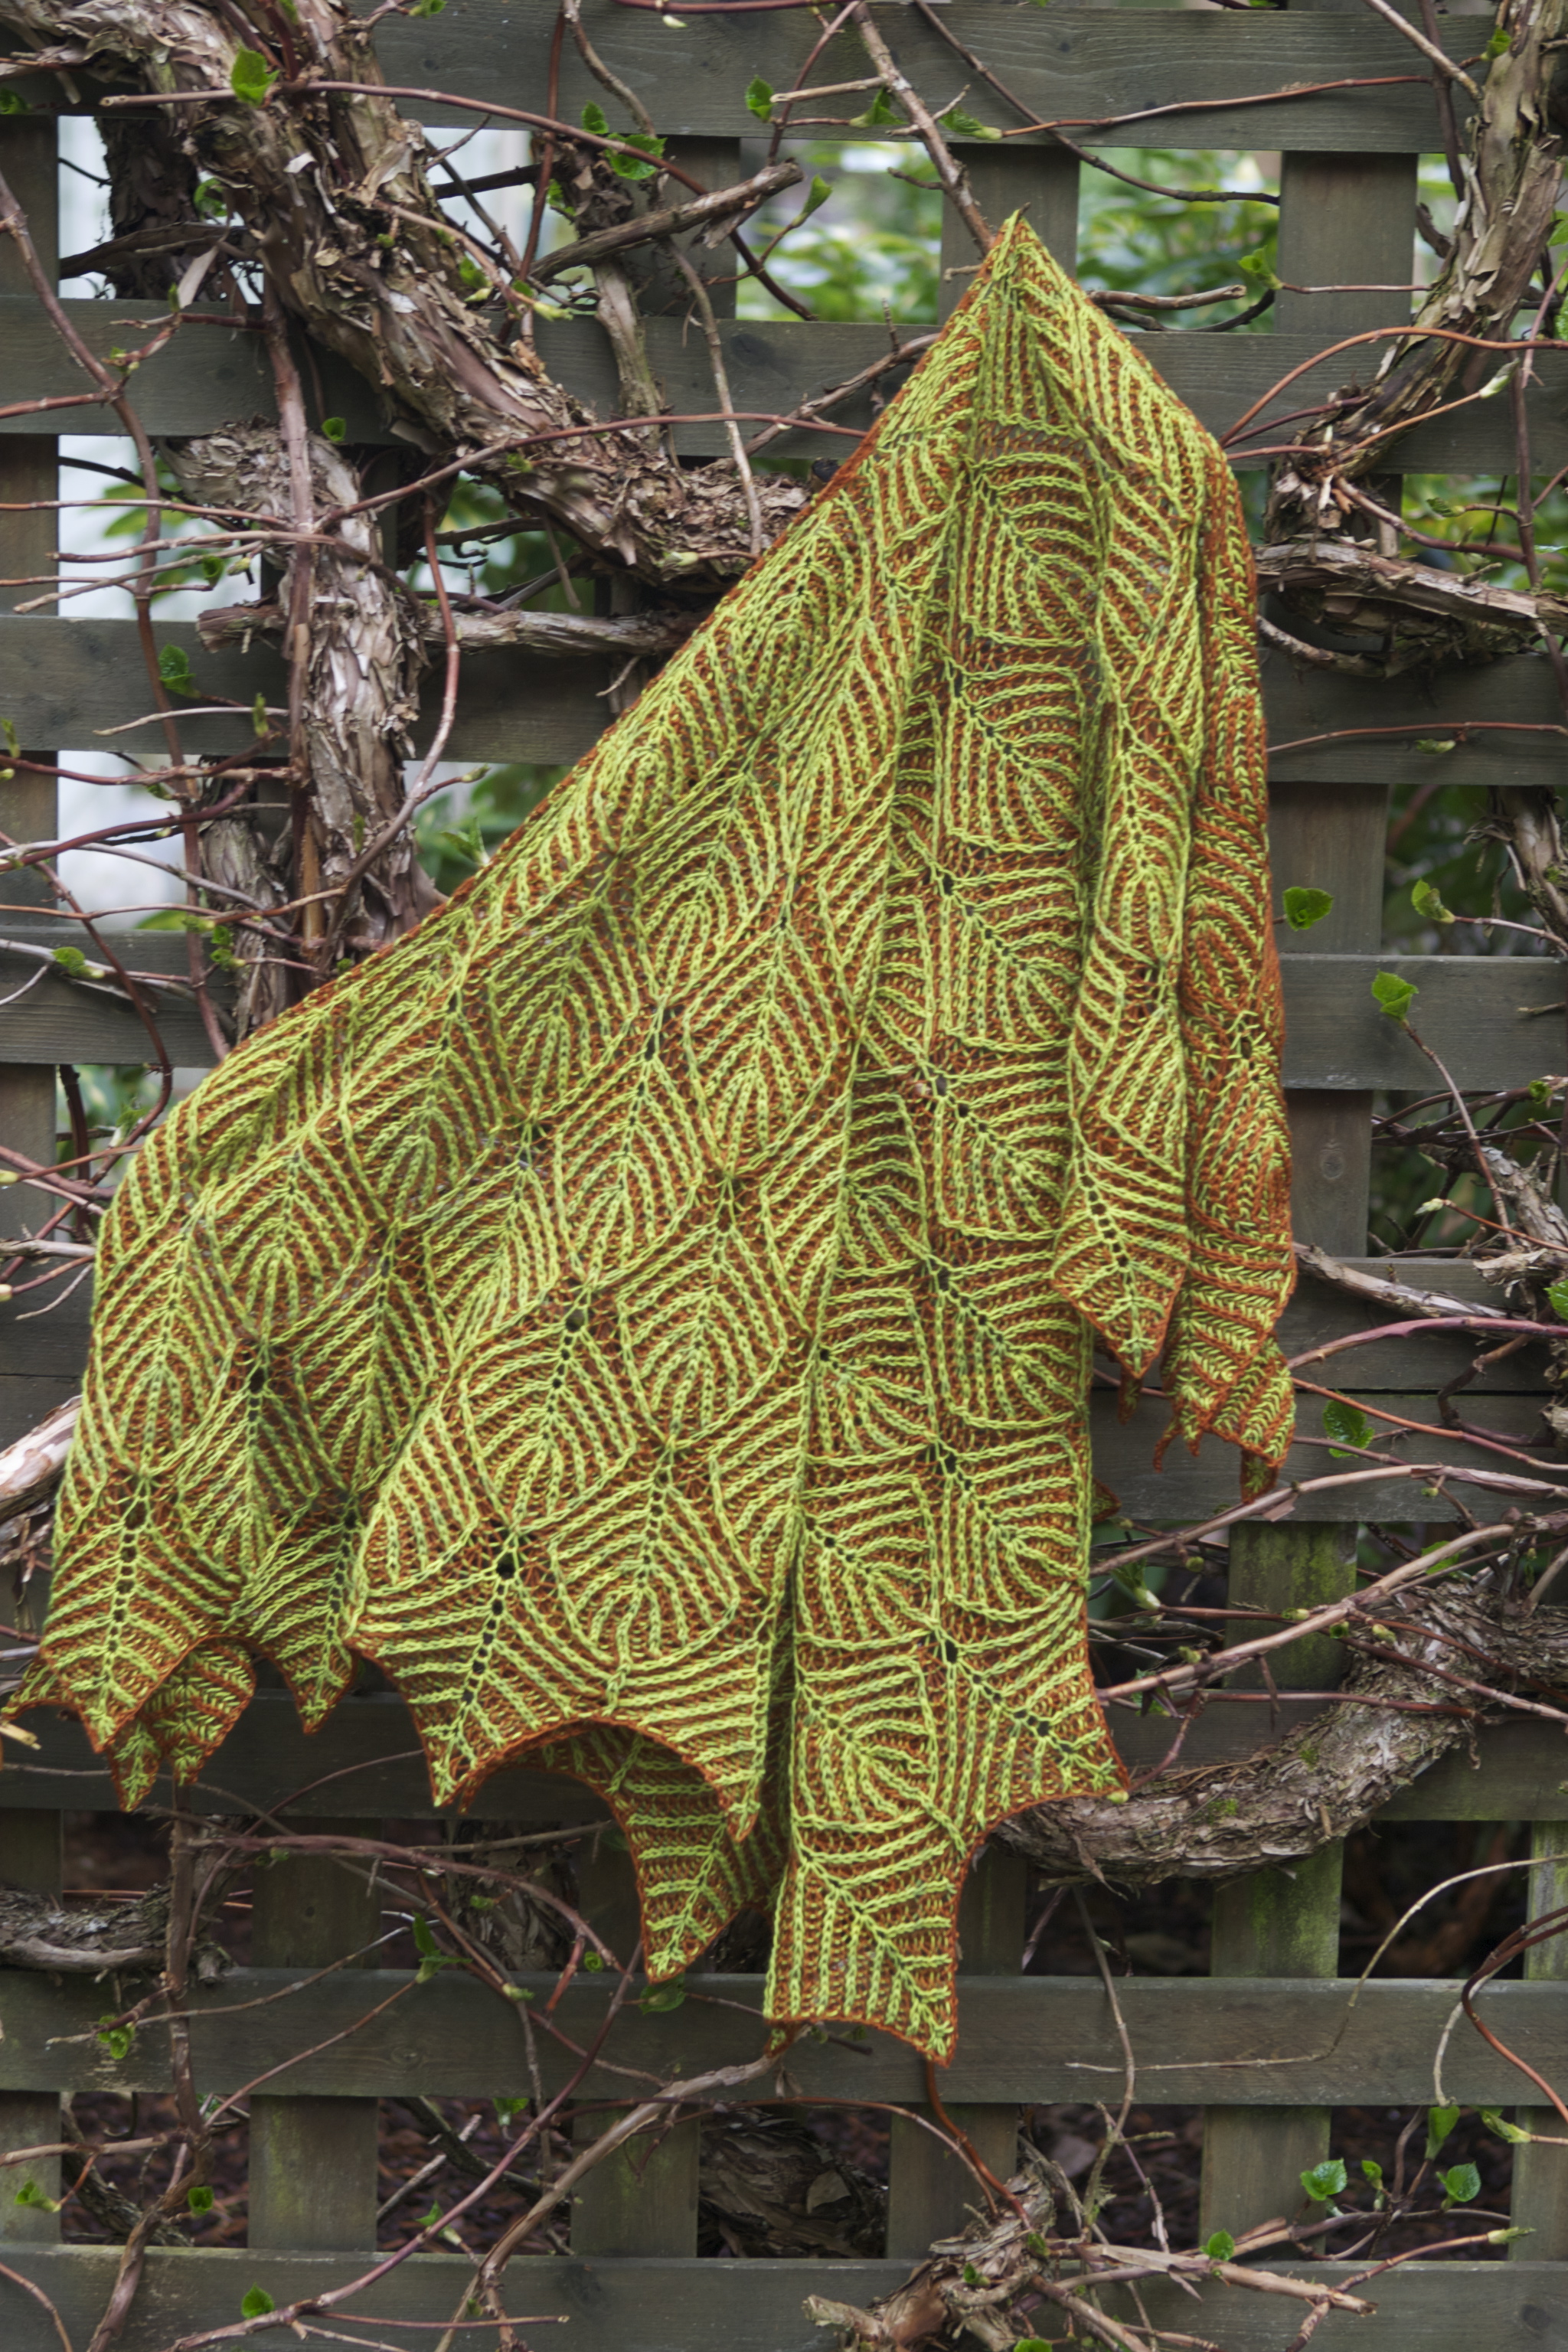
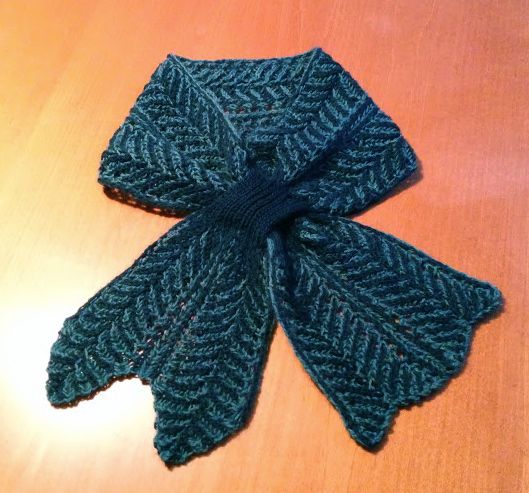
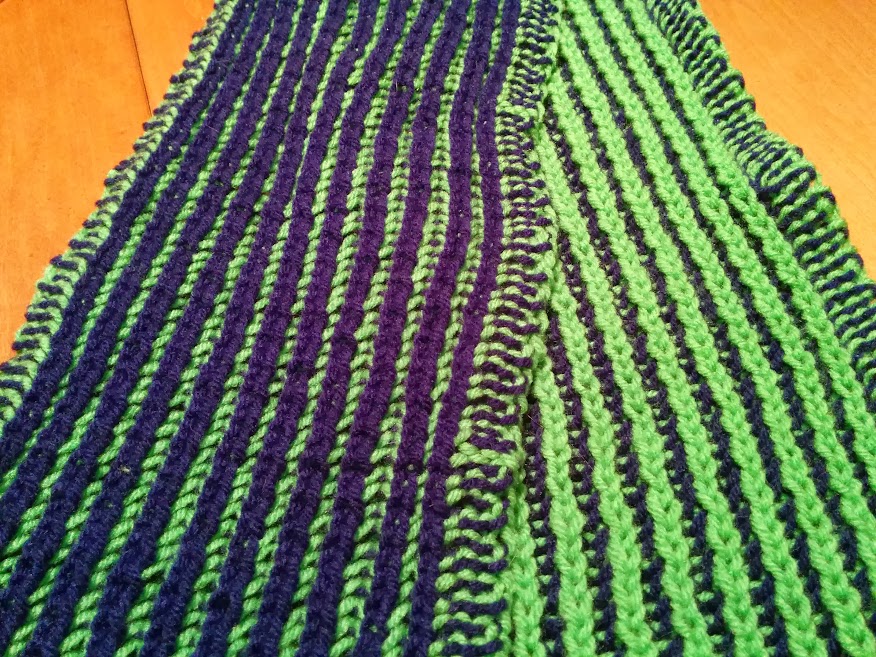
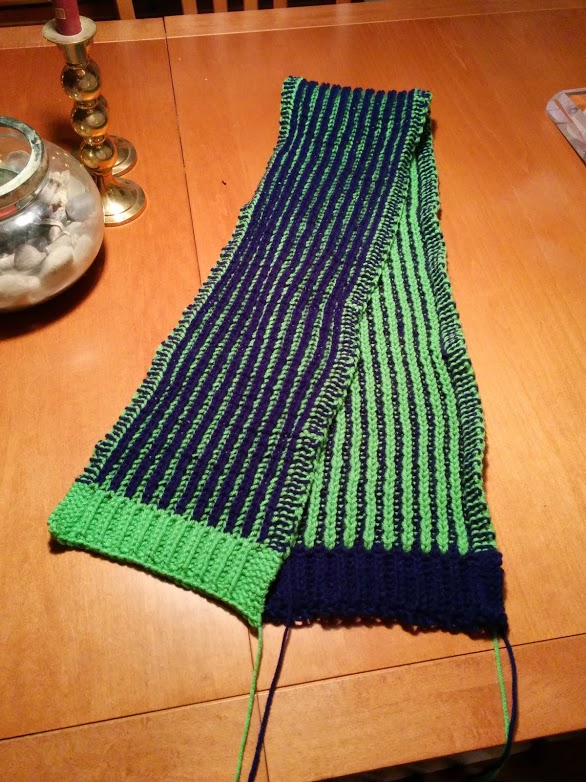
I started out with another 2 color brioche project, because I wanted something in between my “epic Brioche project” and the simpleness of the Seattle Brioche Scarf.  I didn’t want a super big project though… so I picked one that took less than 200 yards and finally frogged the cut off tails of my Luscious Sweater.

The pattern is called Rodekool, which is Dutch for Red Cabbage

The pattern is Rodekool, which is Dutch for Red Cabbage

Challenges in this project included, increases and decreases in two color brioche, learning the Italian Cast On method, and maybe, though I can’t quite be certain I got it right.. the Italian bind off.

Based on the yarns original project, I call mine Luscious Cabbages

Based on the yarns origins, I call mine Luscious Cabbages

I actually still have yarn bits left, so I might try to work out a hat to go with this one at some point in the future.  Mostly though its the lighter Tidepool heather color.

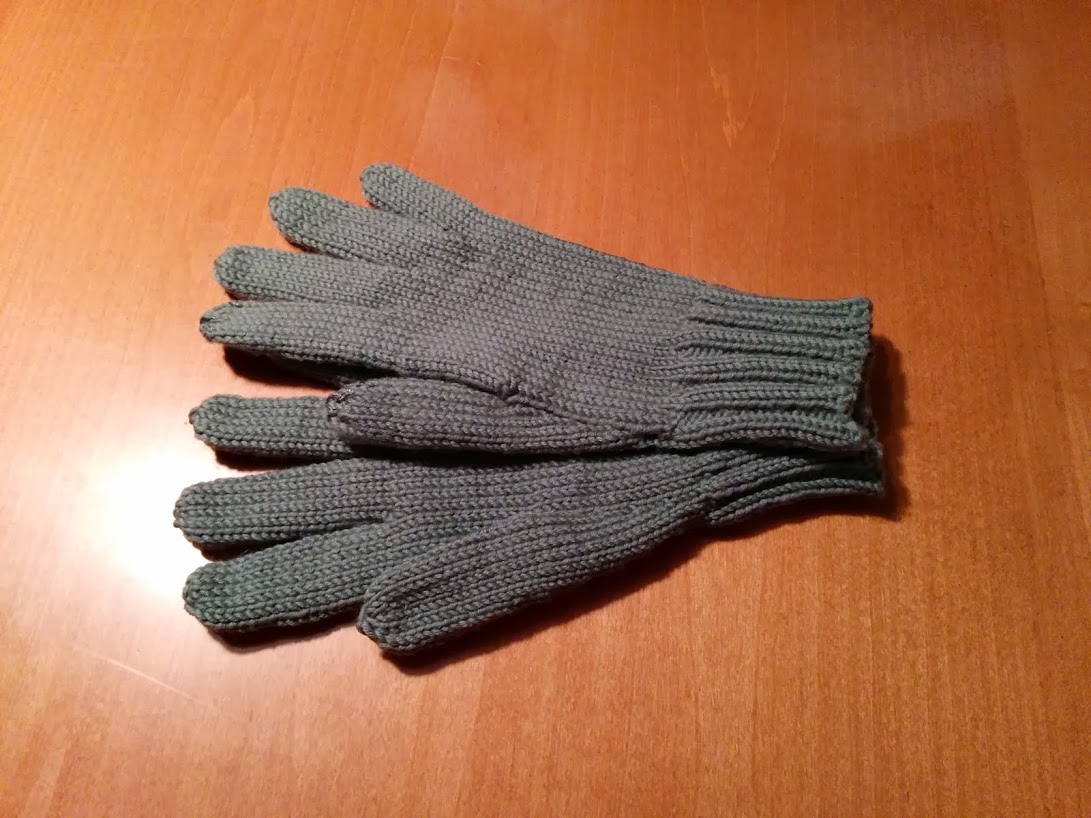
The second challenge is right out of my list of ideas for 2014:  Gloves

Right hand thumb and Index  include Conductive thread additions for use with a smart phone or tablet.

Right hand thumb and Index include conductive thread additions for use with a smart phone or tablet.

I went for fairly simple pattern, because I already had some superwash wool in worsted left from my Debora Counterpane.  I didn’t find them too hard, but I know some knitters find the fingers to be rather fiddly bits they don’t enjoy.  Its such a widespread opinion, that out of the 718 entries in the Mittens and Gloves category, there are only 14 that are gloves with fingers!  Everything else is fingerless or mittens.

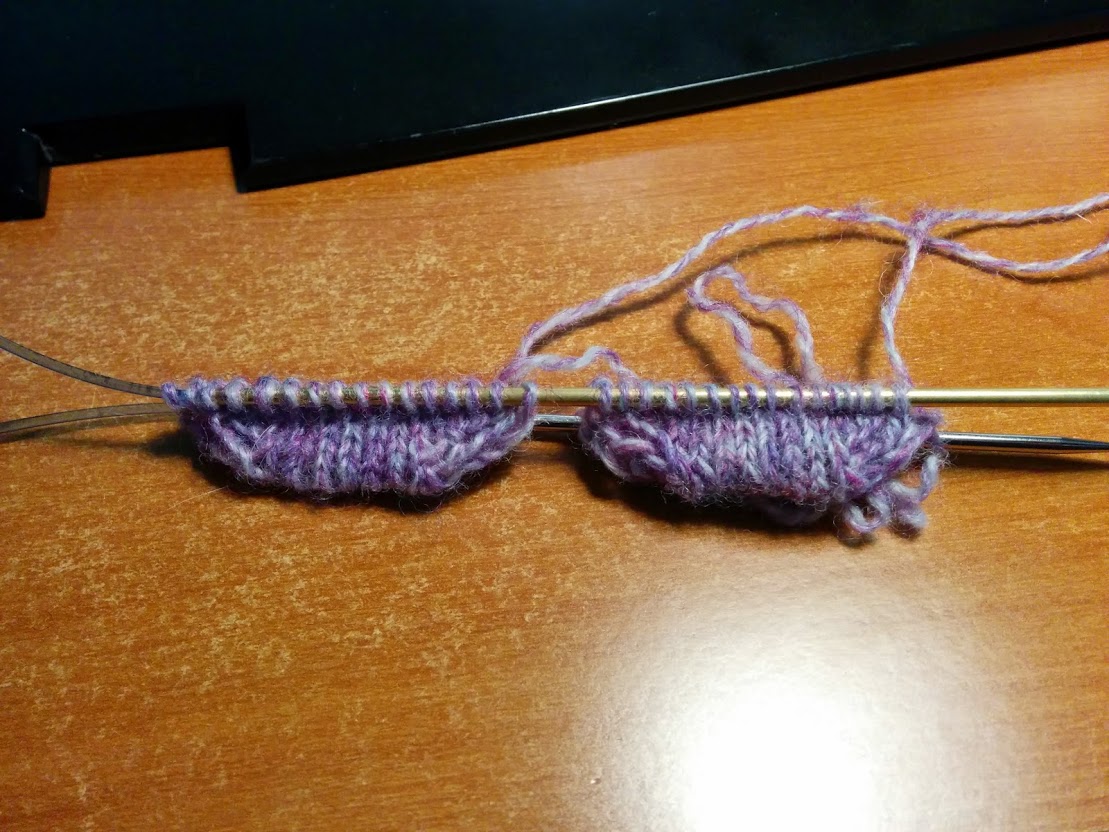
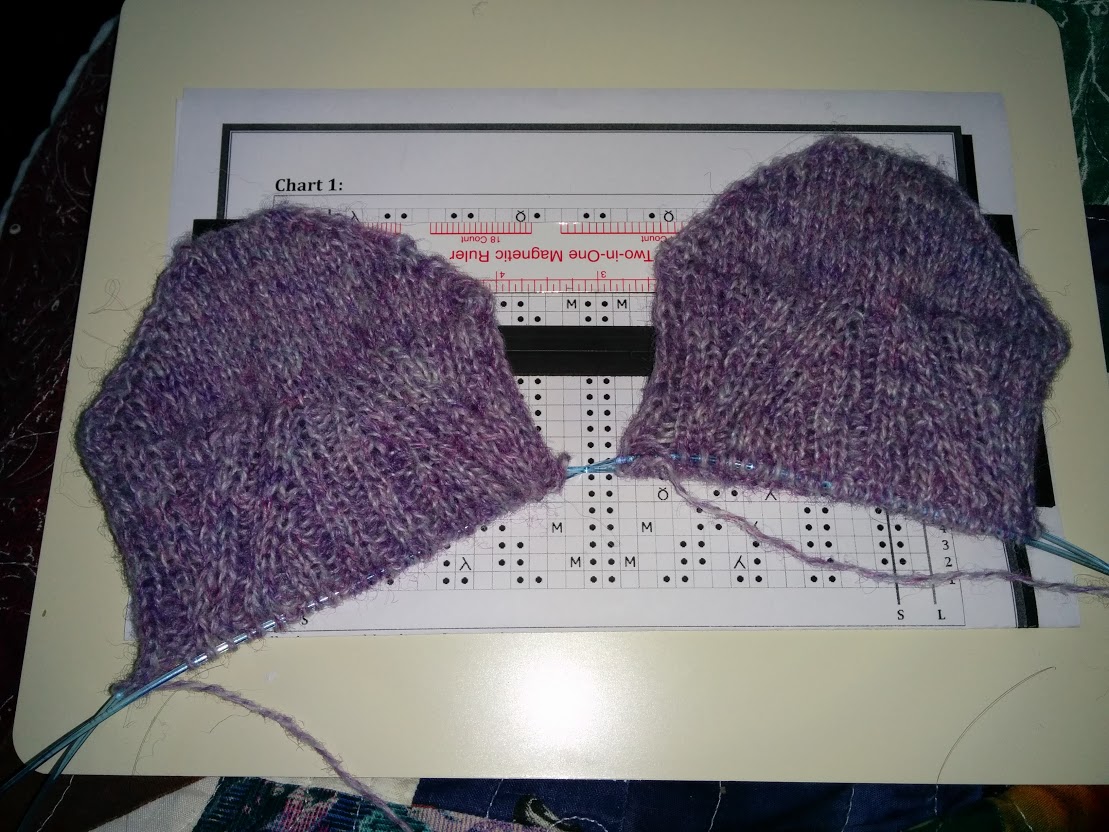
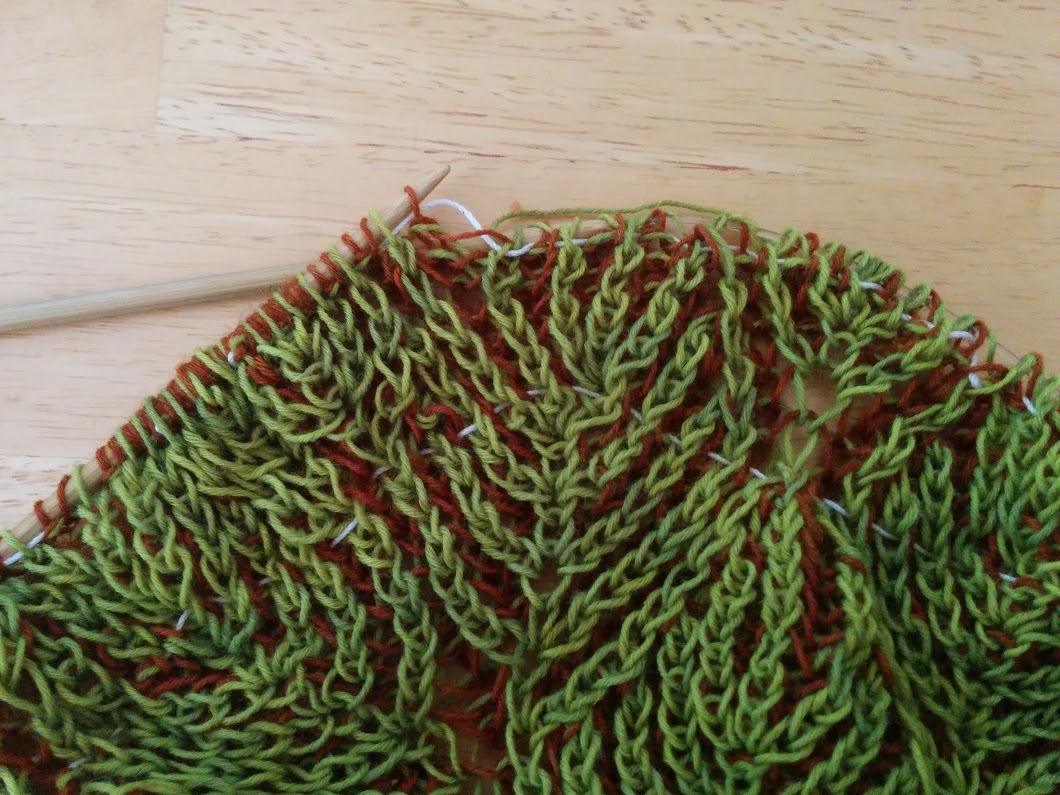
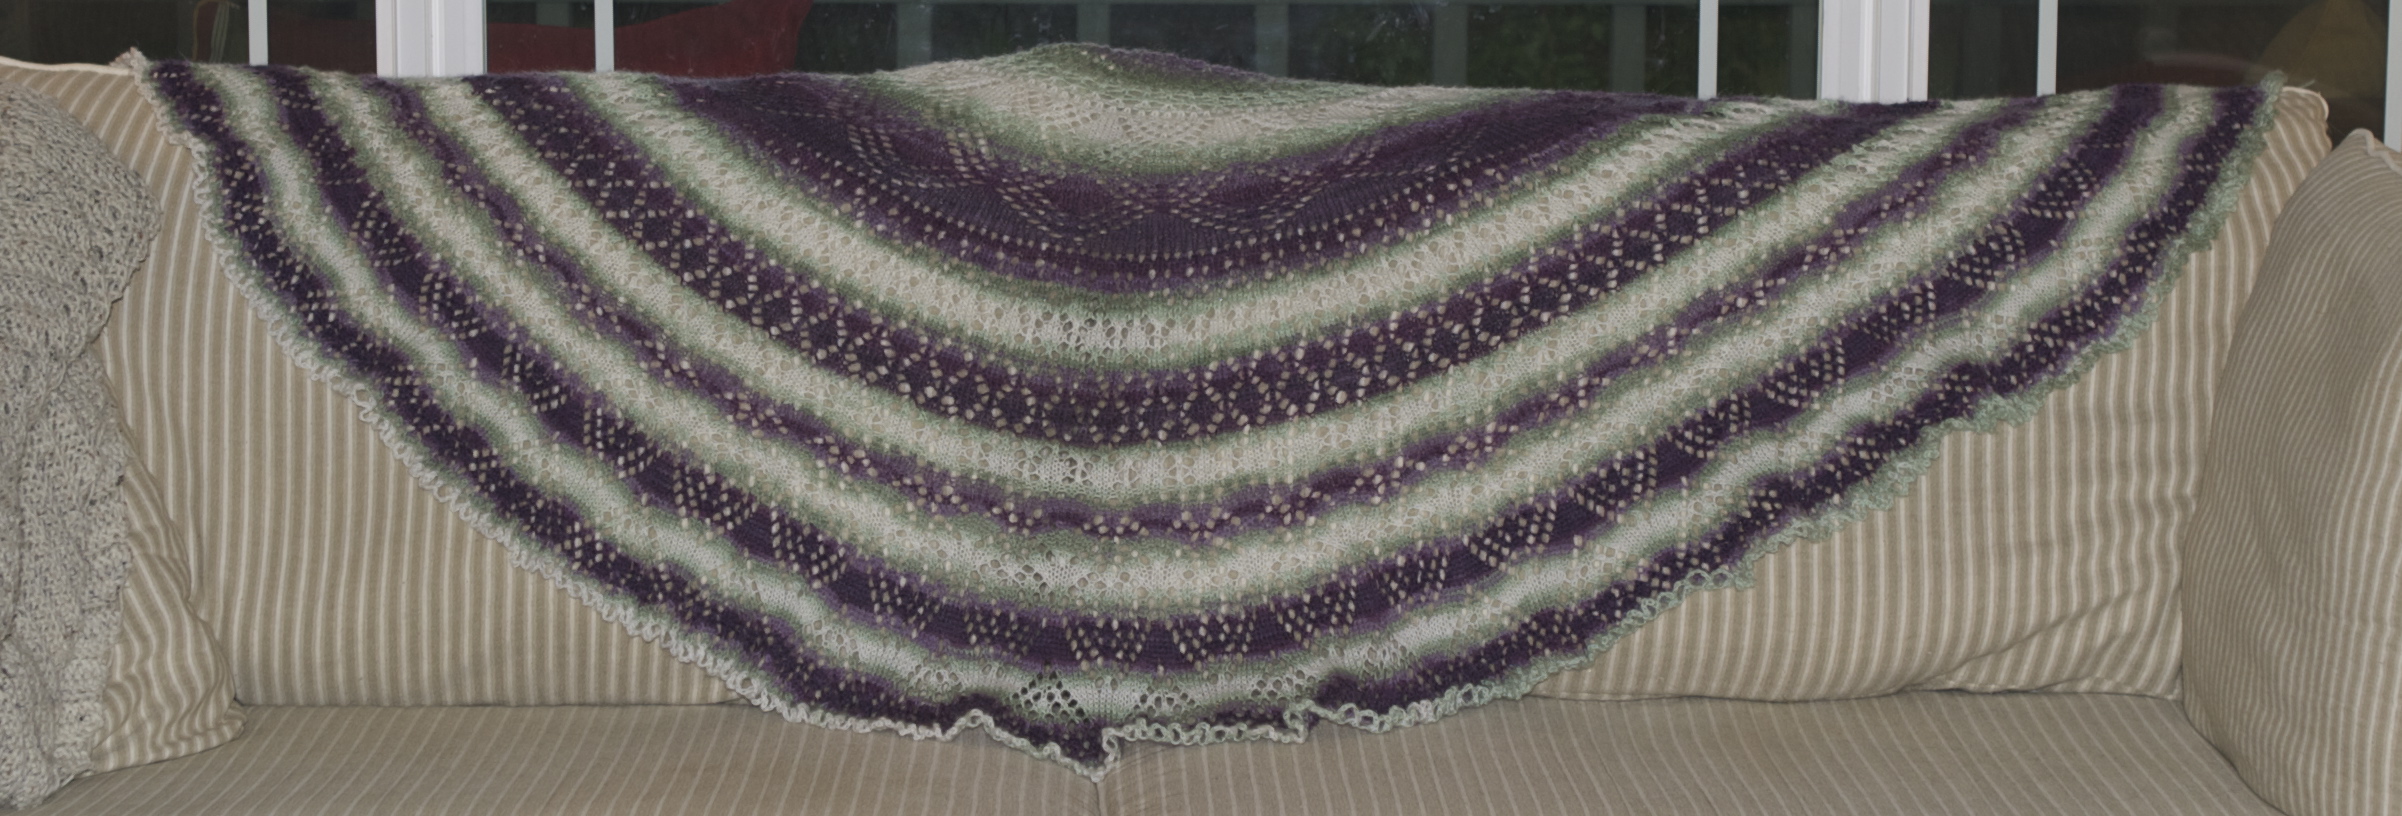
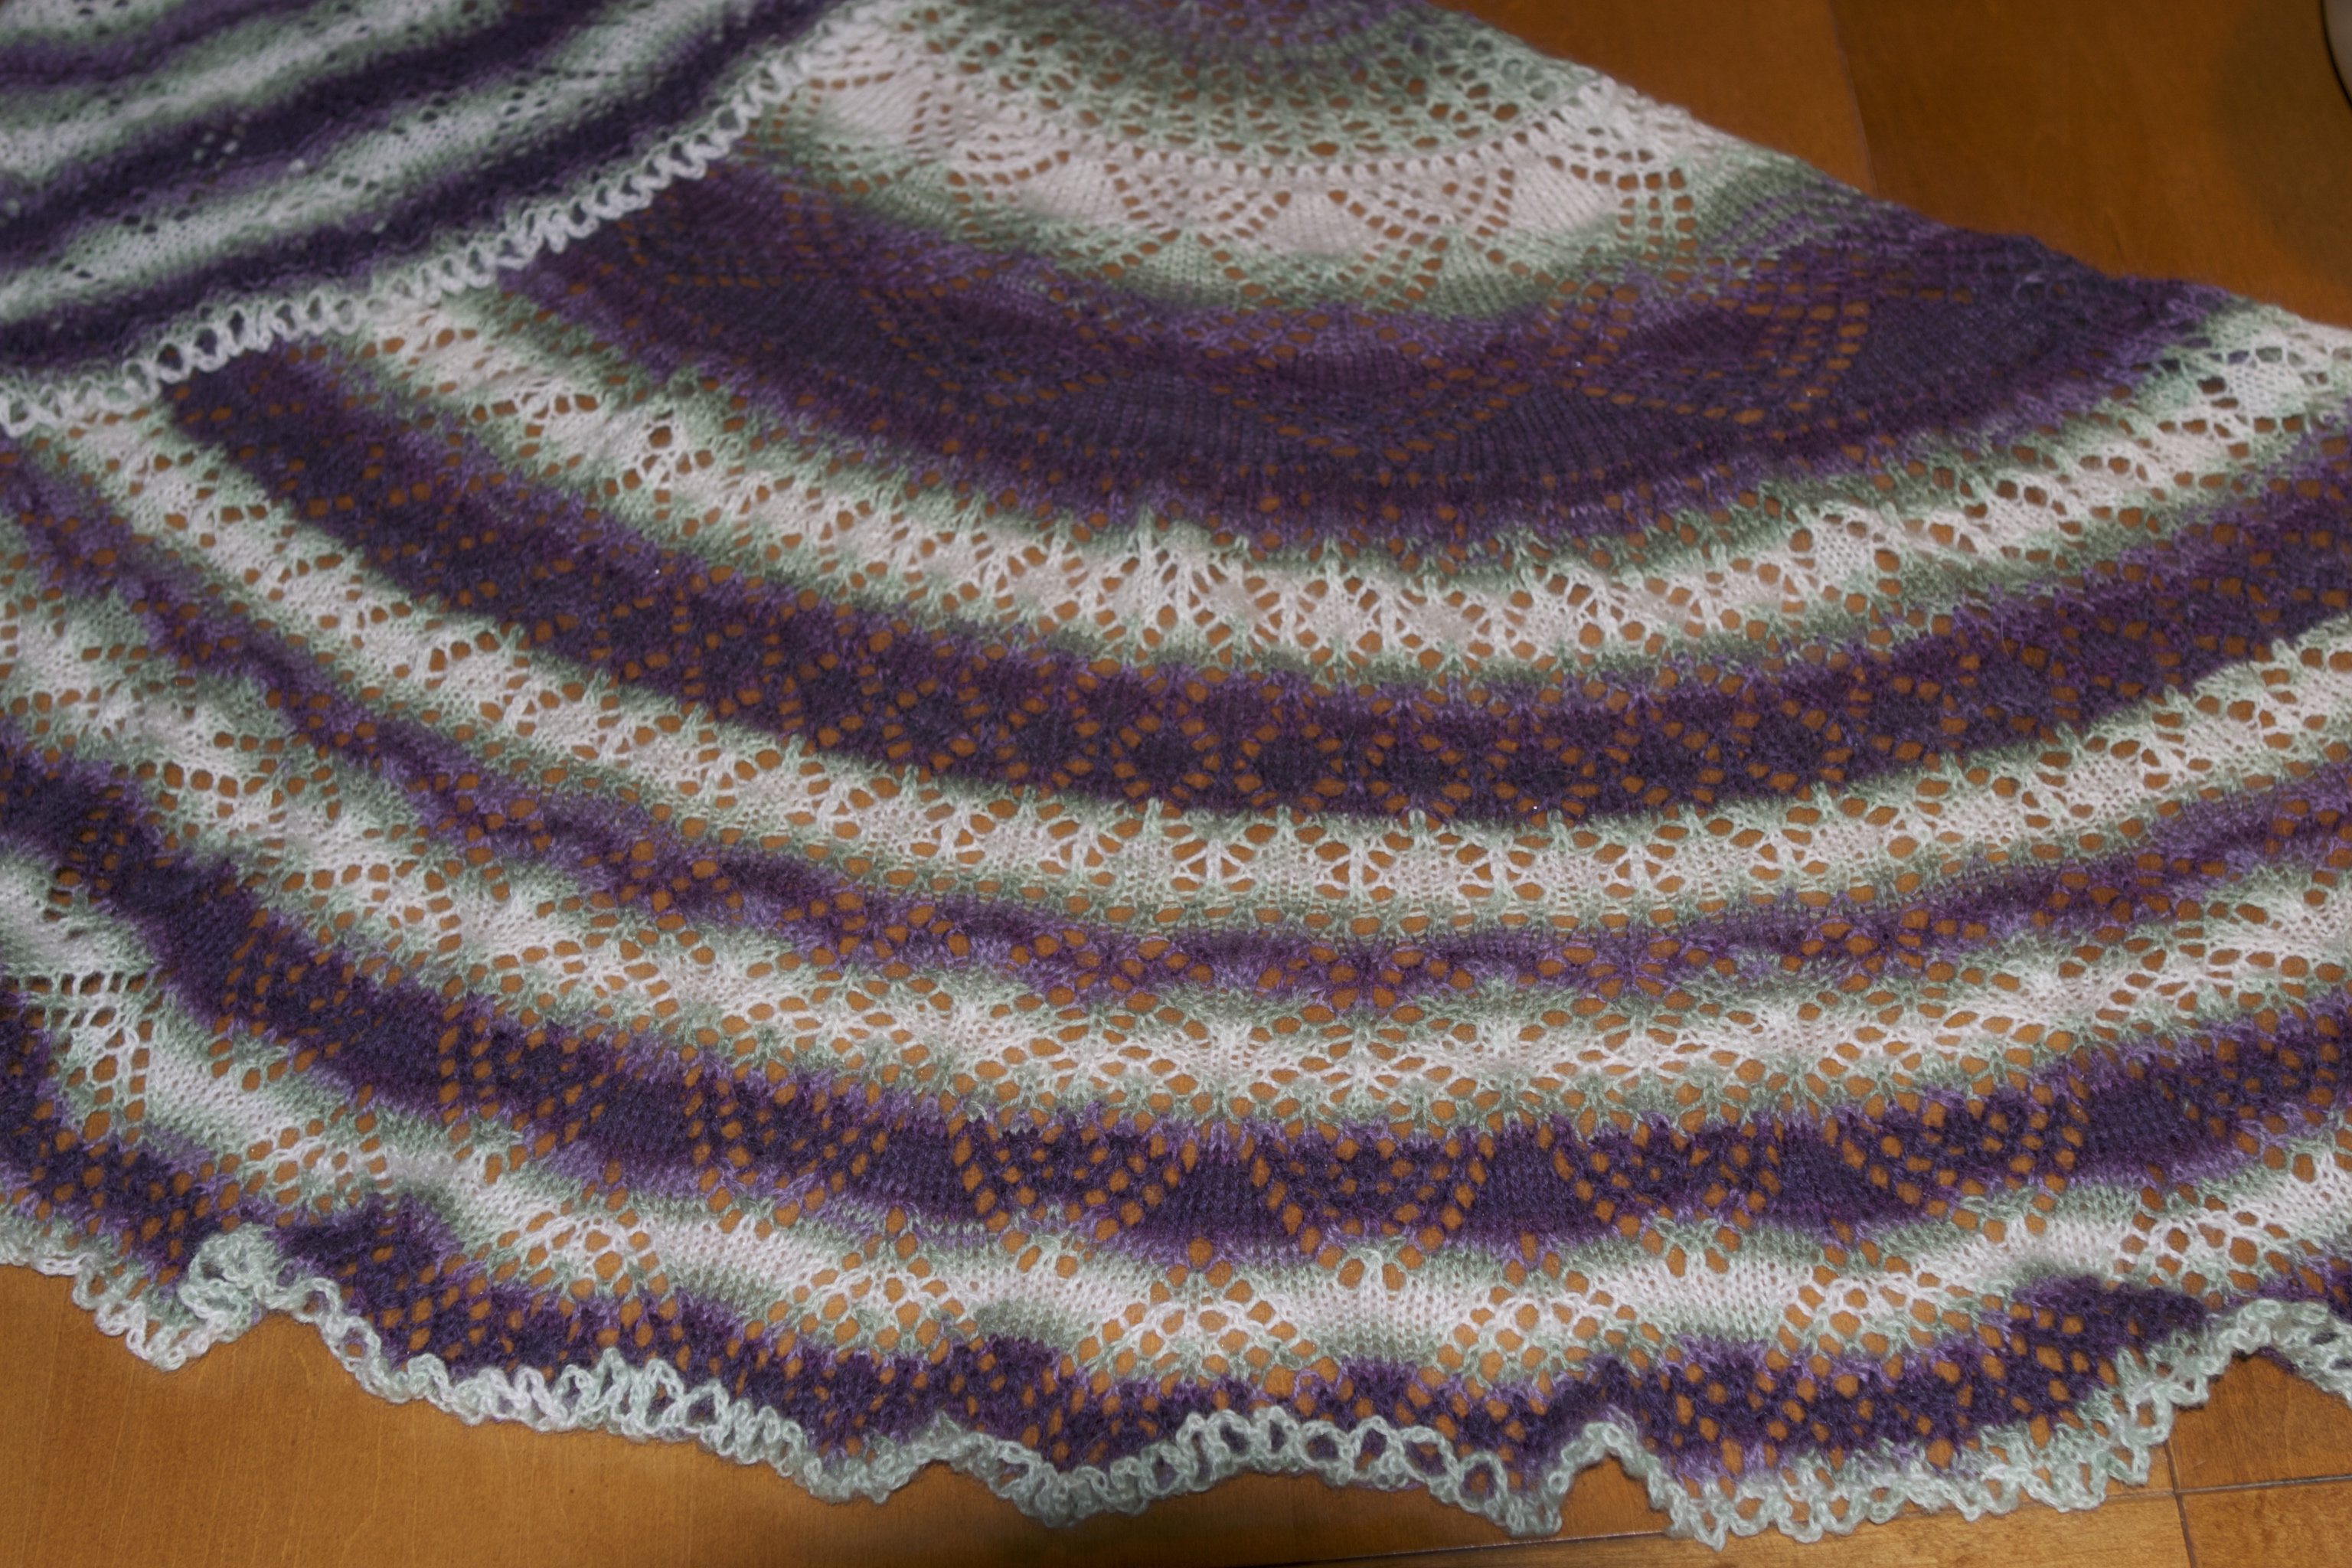
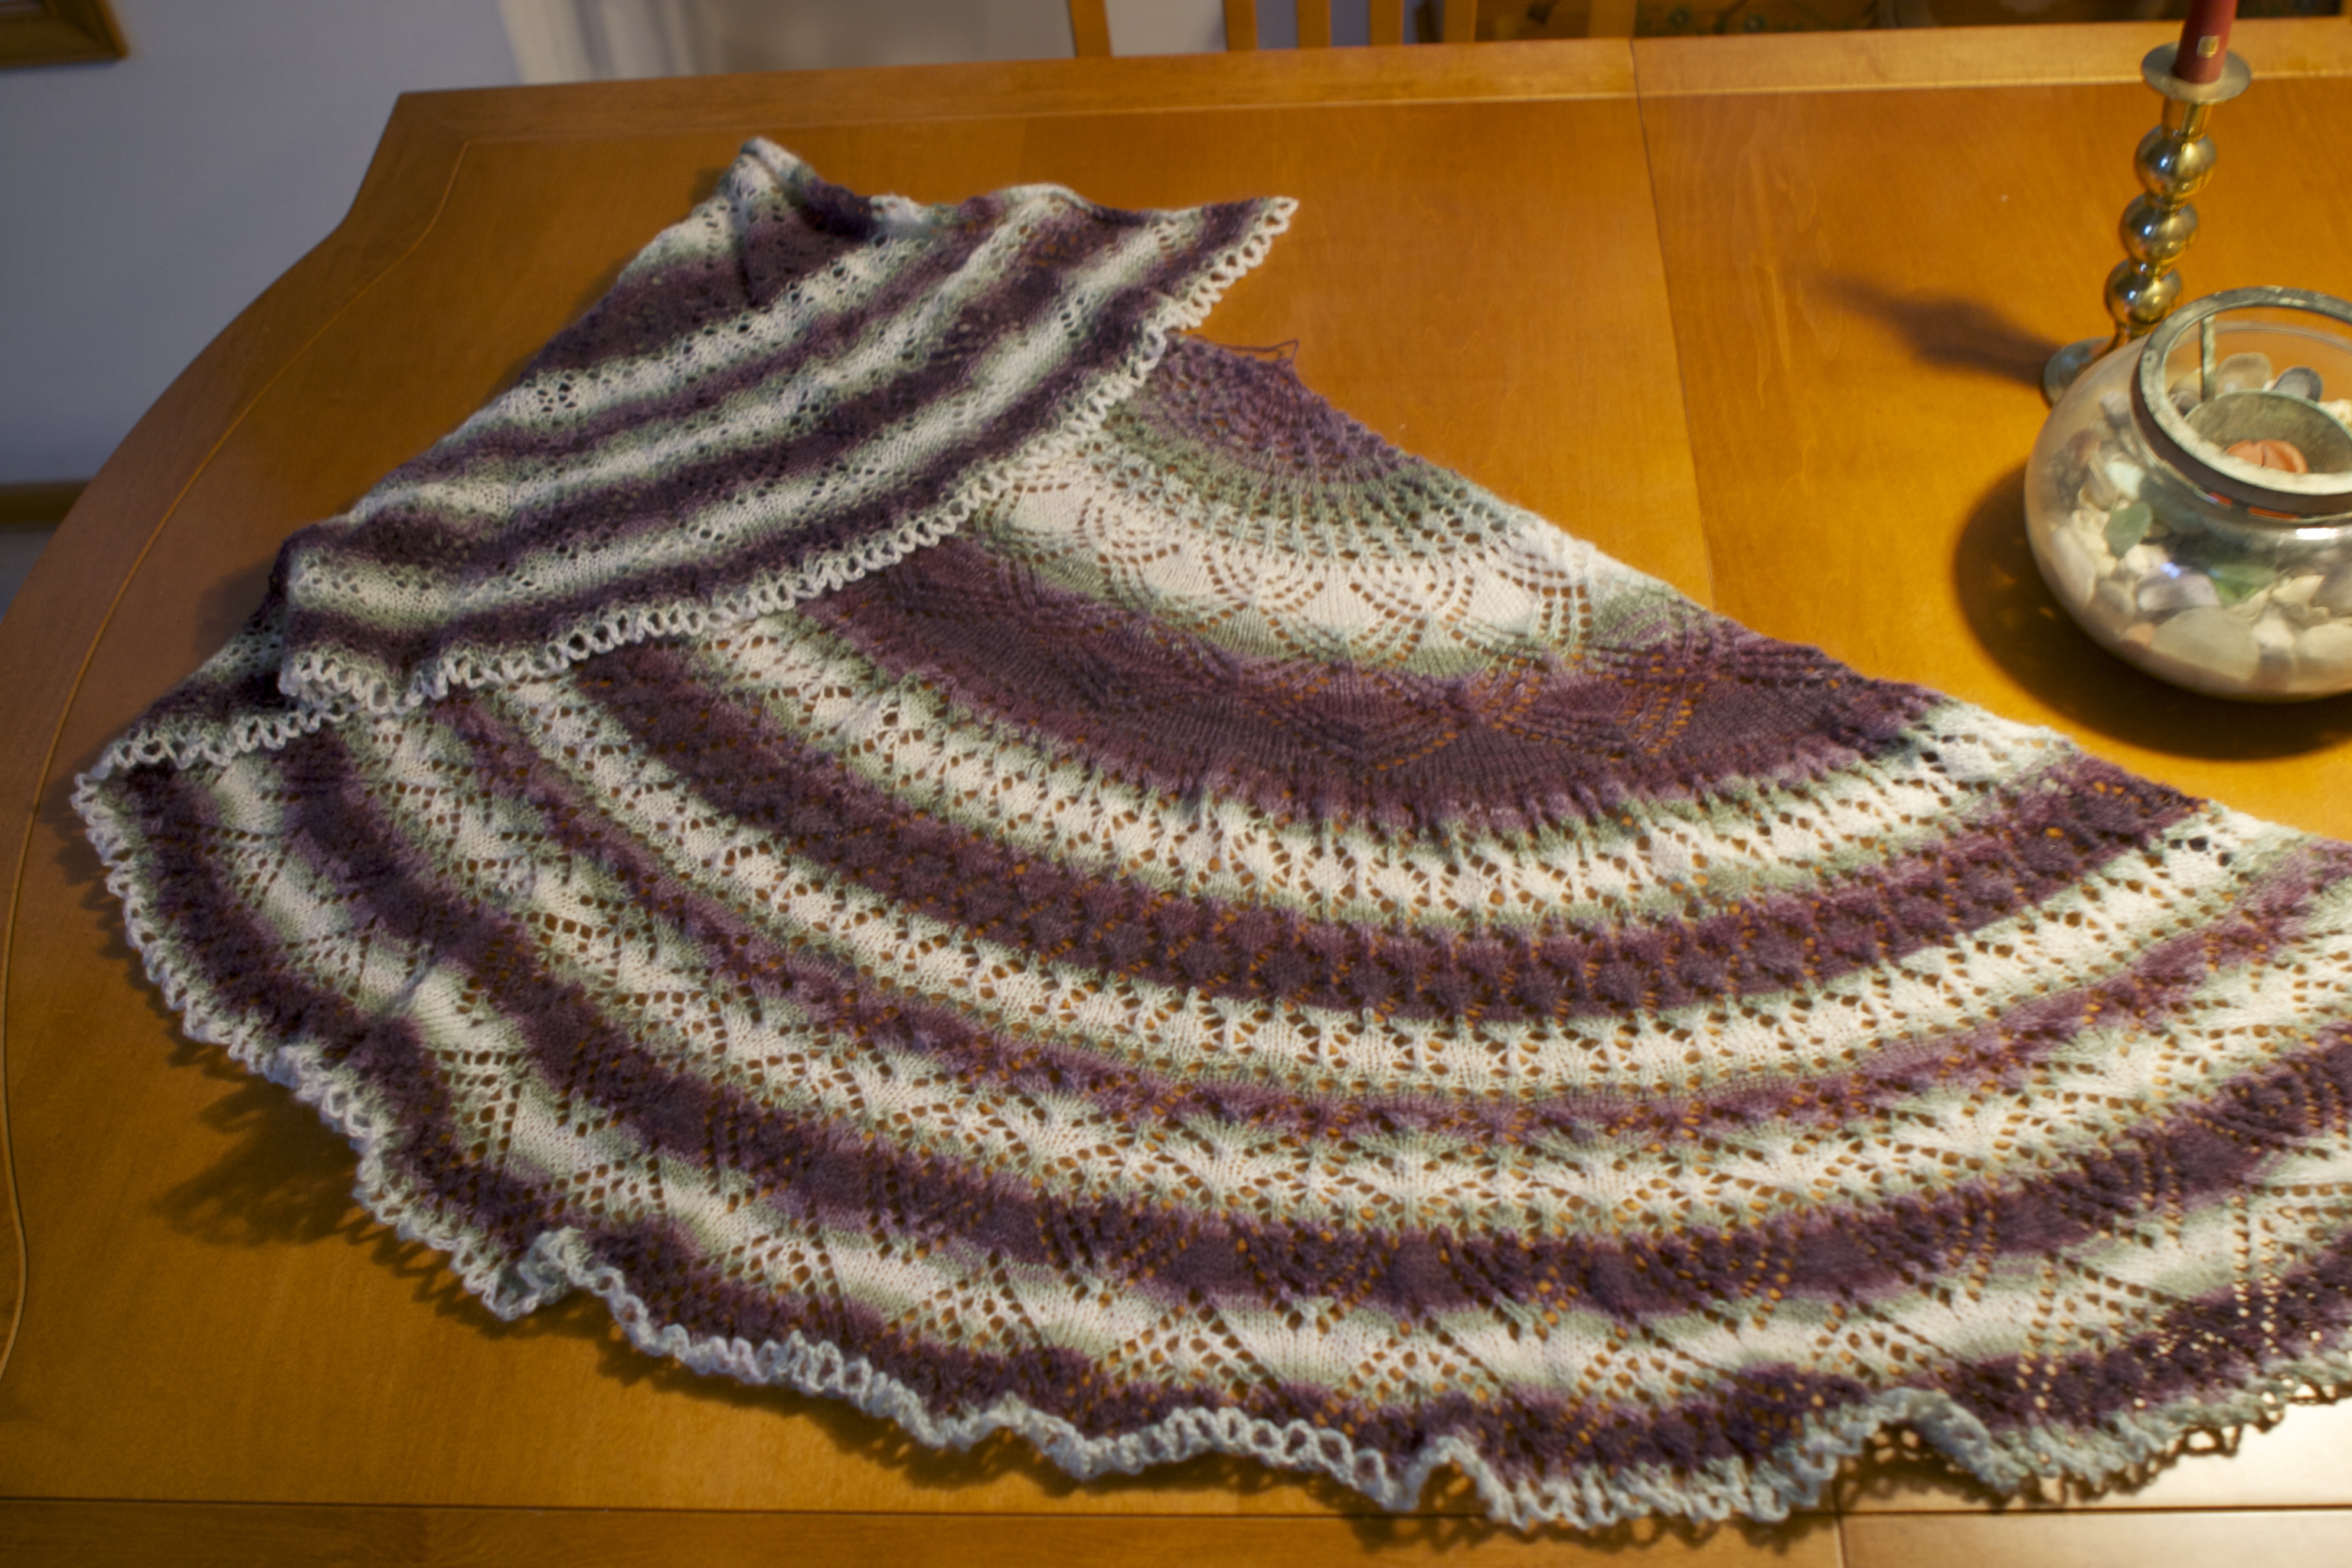
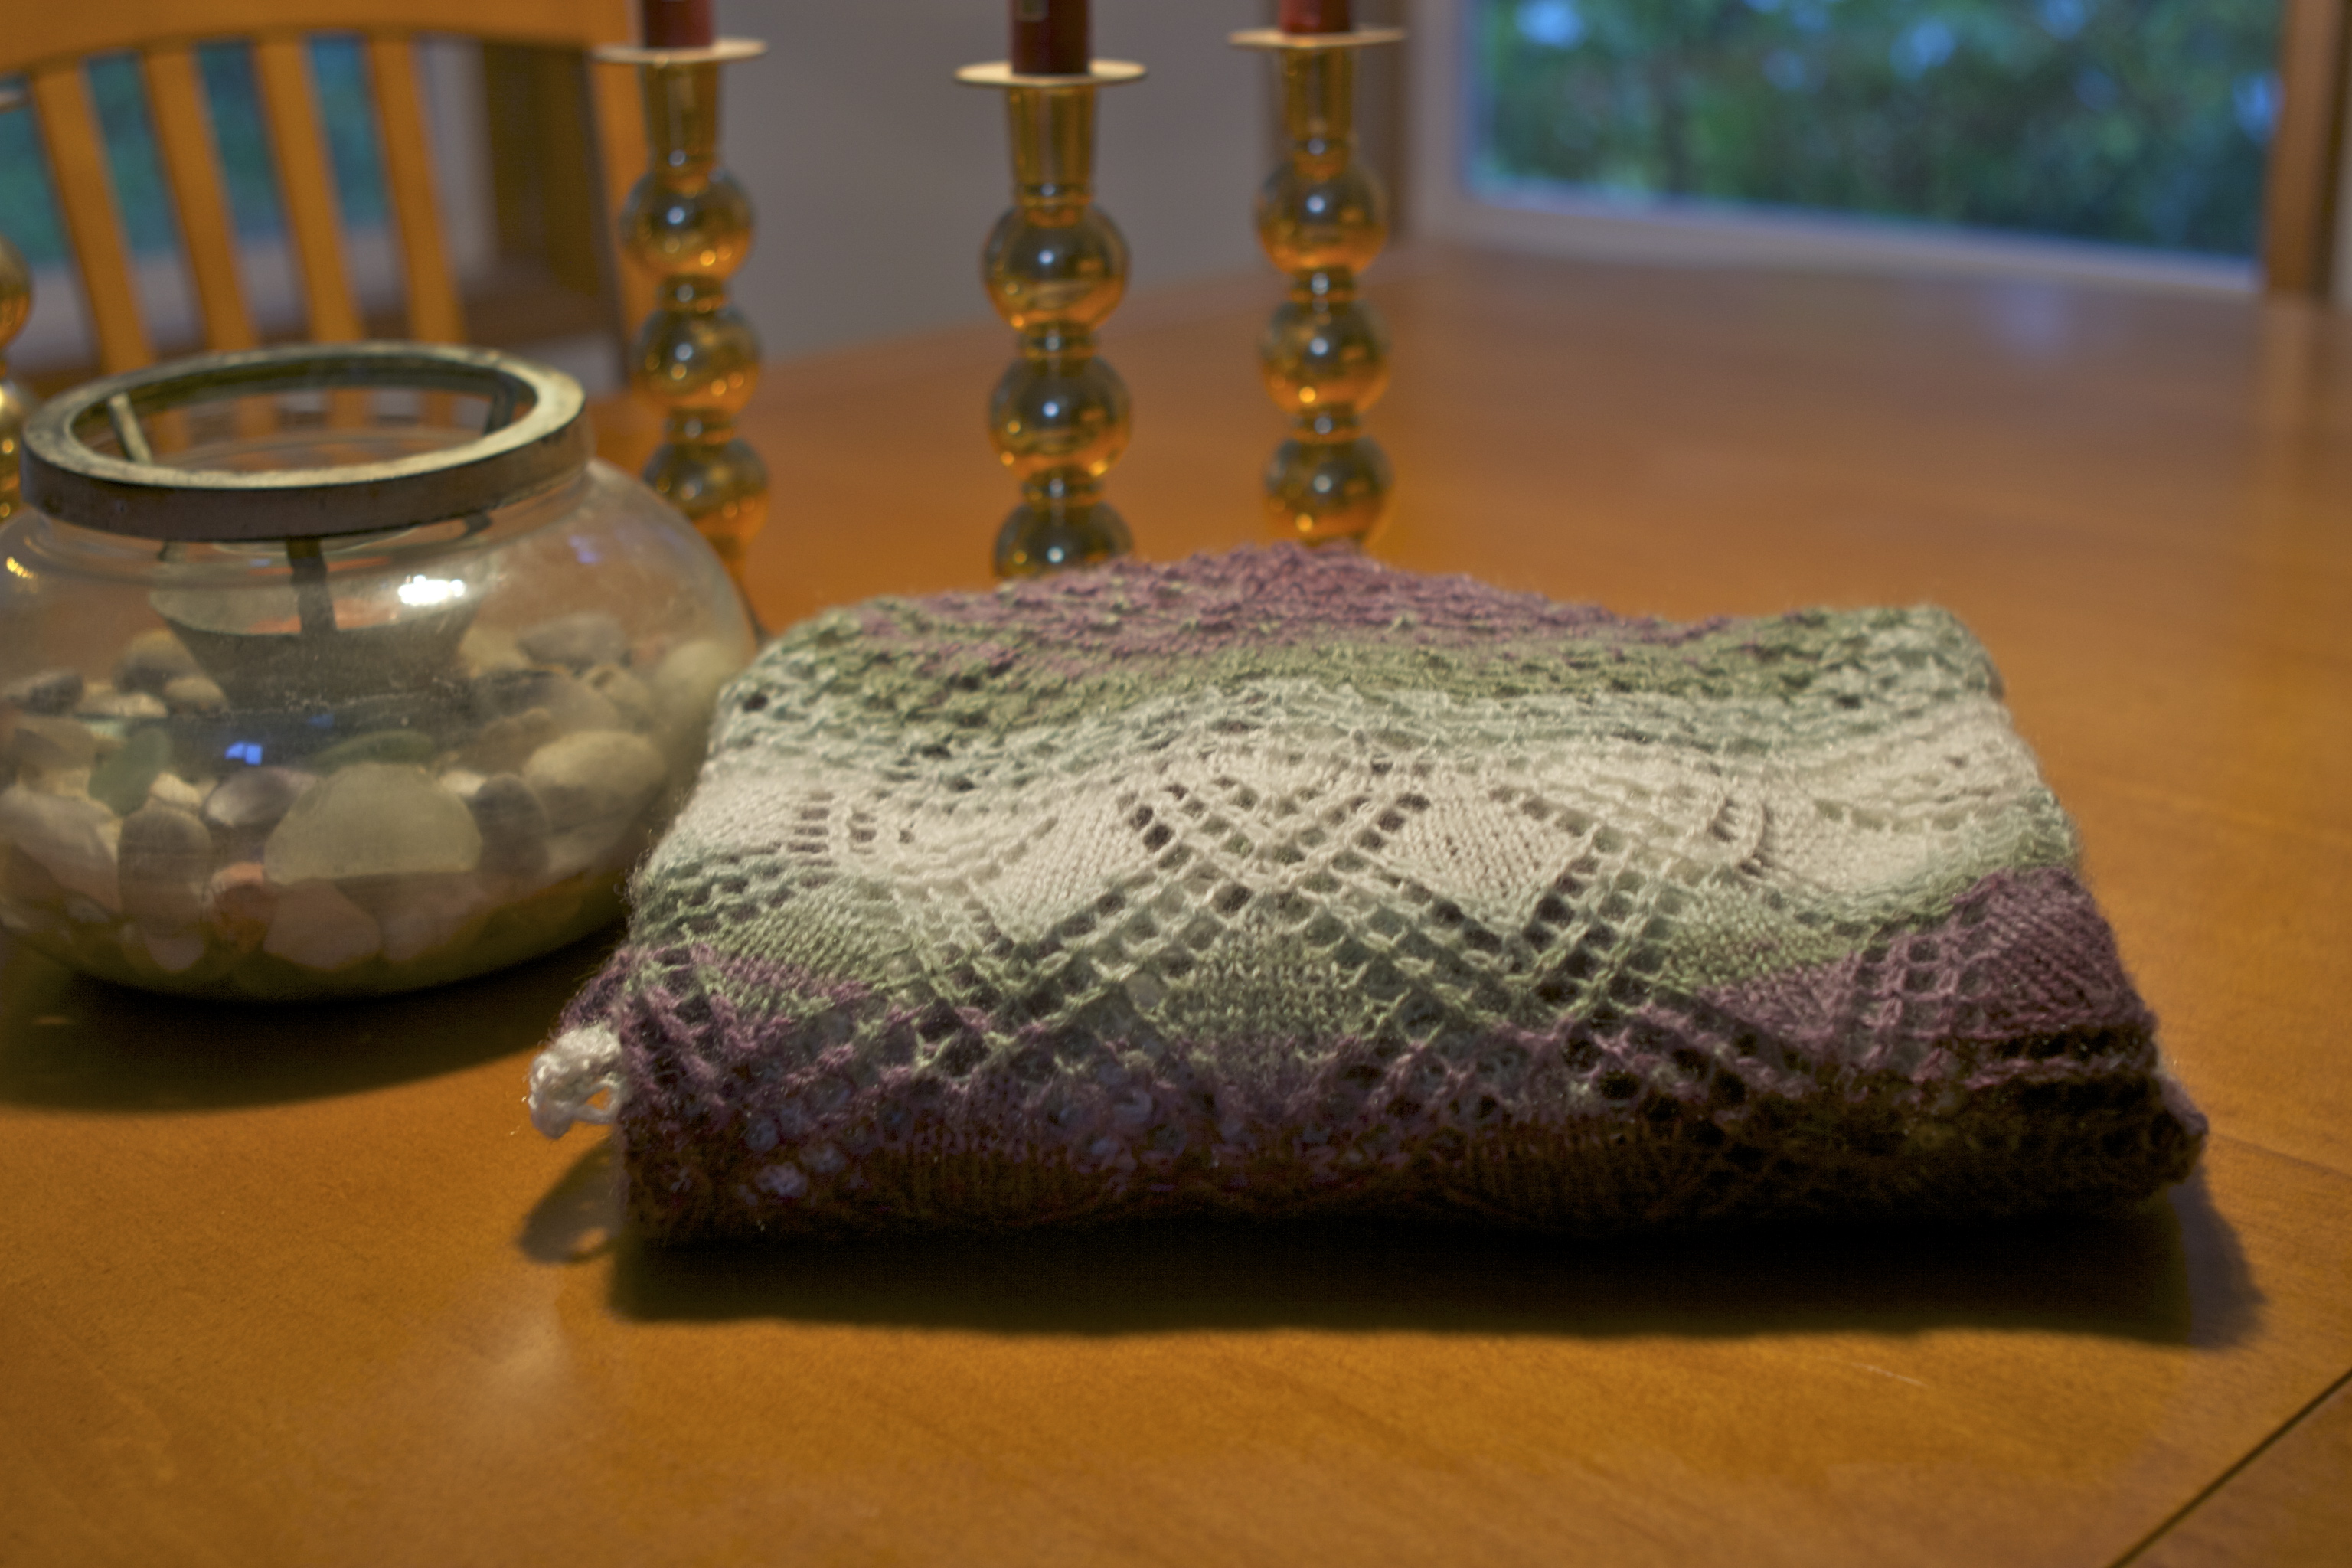
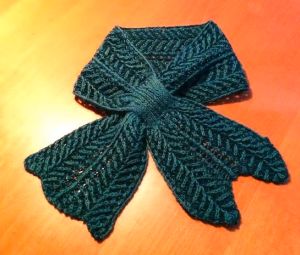
Part of the reason I took a break from the 2 color brioche was the keyhole scarf  was more challenging than I expected, it was a “2 swears” project.  Which overall is a bit unusual for me.  The whole reason I wanted to learn how to brioche in the first place was for the project I cast on next…..  a two color brioche leafy shawl.

This too, had a different style start, and different increases and decreases.  So I thought I should start with an oversized swatch to see how it went.

Size 10 needles and worsted aught to do it...

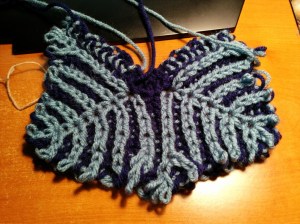
Size 10 needles and worsted ought to do it…

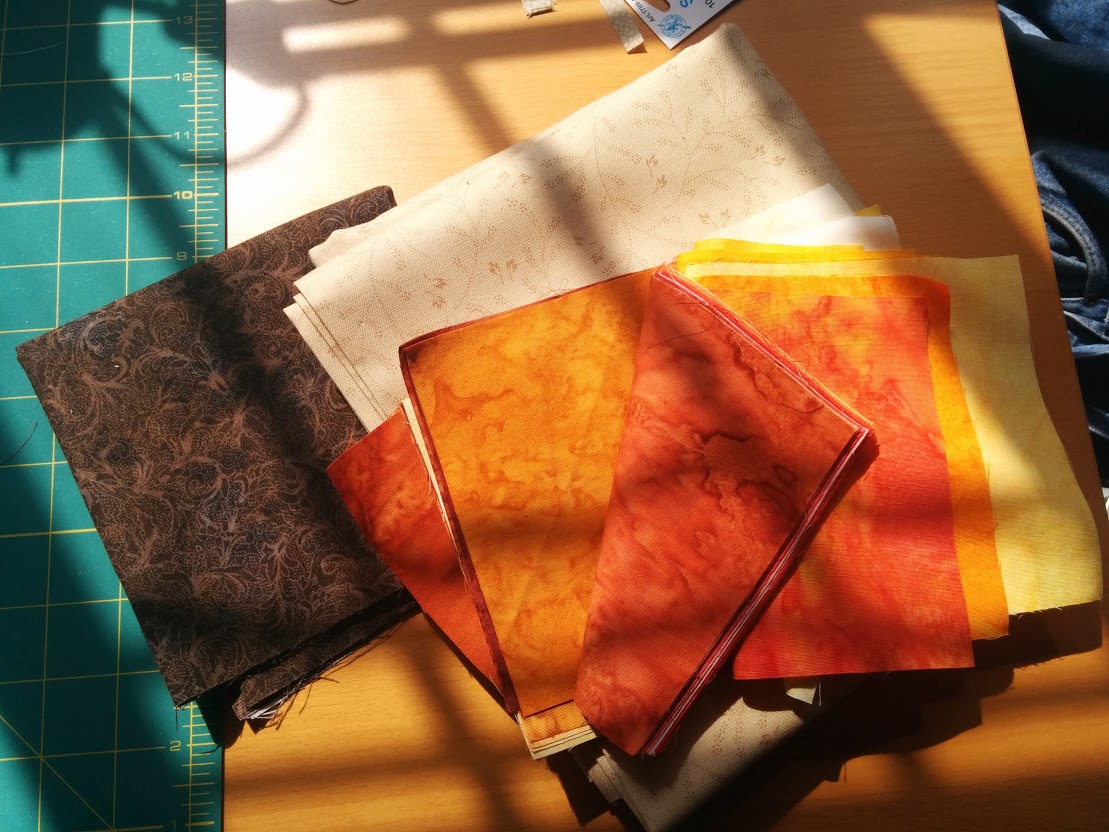
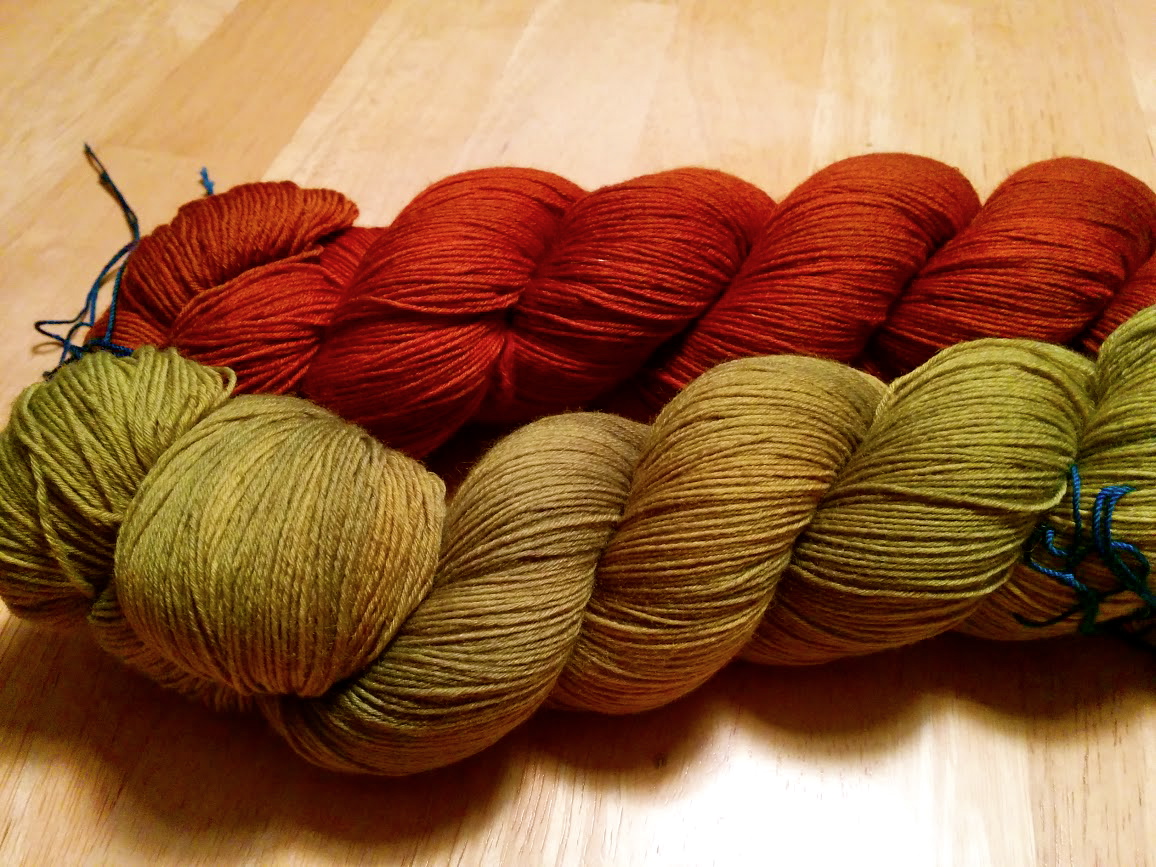
Now I wasn’t paying enough attention to how long I had to finish, so I didn’t technically get finished with my shawl in time to “qualify” for the games.  In actual fact, its still on my needles.  So I’m going to save the shawl for another post once its completed.  But I will leave you with a photo of the yarns I picked out.

Colorways are Paradise Valley and La Cantante in Mithril (laceweight) from The Verdant Gryphon.

Colorways are Paradise Valley and La Cantante in Mithril (laceweight) from The Verdant Gryphon.

PS – if you click that link in the last caption and find yourself falling in love with the yarn and want/need a referral code be sure to let me know either in the comments or via the email on my About me page!

The Good, The Bad and the Brioche!

The Good

Thus far this month, I’ve tackled a few smaller quilting projects.  One of which started out as a simple conversion of a bedskirt into a set of valances for Dale (of the Sunflower Dresden quilt fame).  But then I had fabric left, and if you do any kind of scrappy quilting that you can’t let so much as a perfectly good 2 inches of fabric go to waste, let alone any amount larger than that!

So I made a normal pillow case, trimmed in “valance plaid” and then I had more fabric so I made a few quilt block decorative pillows too.

Three pillowcase fronts.

Three pillowcase fronts.

The blue and yellow floral is new, but the dark blue and yellow are scraps from her sunflower quilt, the light blue from my first quilt.  Both smaller pillows are backed in her “valance plaid” to help tie the whole ensemble together. The inside pillow forms were made from some of the plain white that was a part of the bedskirt.  So all told I bought a yard of fabric, and ended up with 3 pillows, 3 valances and I still have a smidgen left.

Smaller pillow features my first ever button holes on my sewing machine too!

Smaller pillow features my first ever button holes on my sewing machine too!

The Bad

First off, I decided to join in a Quilt Along (QAL) with an online group.  (Details here) Now the joining wasn’t the bad part; its probably more of the good part since I don’t belong to a quilting guild or tend to get very social with my knitting and quilting.  But… the shop was out of the recommended interfacing, and the line was forming behind me at the cutting counter so in the words of the third knight in the Temple at the Canyon of the Crescent Moon, I chose poorly.  I chose a non-fusible/non-sticky kind, and its too narrow to do a whole block at a time.  I am attempting to forge ahead with some spray adhesive to see if I can make it work.  Thus far I’ve laid out the first block:

Here's a photo while I was waiting for the adhesive to dry.  You can see where I will need to seam the two sections together.

Here’s a photo while I was waiting for the adhesive to dry. You can see where I will need to seam the two sections together.

Like most of my quilt projects, I tend to take several cell phone photos of it as a work in progress and post them in an album.  Which you can check out here.  Wish me luck!  I might just need it.

In other mixed good/bad news, I did forge ahead with three more stars on my giant star quilt.  I am not super thrilled with how some of the points came out, and was feeling kinda crummy about it.  I do think the later pillow project actually helped, as it has similar cuts and came together very well.

A Green and two blues

A Green and two blues

The Brioche!

A while back I fell in love with a certain pattern for a shawl on Ravelry that uses Brioche stitch.  So this year I told myself I was going to learn.  And with the help of some left over Seahawk Action Green, I started with a nice beginner brioche scarf.

Brioche doesn't look like it has a wrong side.  Just a side of a different color.

Brioche doesn’t look like it has a wrong side. Just a side of a different color.

And so just before the Seahawks finished up with the 49ers, I finished up with my Brioche Scarf!

The tails are done in single color.

The tails are done in single color.

Now I just need to find the yarn I want for the shawl project and I’m all set.  I’m looking for a spring green  for one color and autumn spice for the other.

Block and Load!

So I really liked the yarn I used for my Spring Thaw Shawls, (which was Paton’s Lace btw) although with the mohair it does have a bit of a halo that may not be ideal for all designs, and its a bit more crabby about any frogging.

Since it had worked out so nicely, I bought some more in other colors.  A simpler repeat pattern lace shawl is actually an ok trip project since you only have to pack a skein or two to work the whole project.  Whilst I was on holiday I started up a Vernal Equinox Surprise Shawl, and based on its name I decided to go with the “Sachet” color way, which is white and sage and plum.

I cast off on the 5th.  The thing with lace is it benefits incredibly by blocking, but non-knitters or newer knitters don’t always see how you got to pile of yarn fluff to the more nice looking lace.  So I’m going to start out this post with an unblocked photo.

Taken at night with poor lighting.

Taken at night with poor lighting.

Issues of lighting aside, it does look like a lace shawl, not super lacy but its not something repulsive either.  And then you block it.

For the record, it is an overcast rainy day, but the lighting is better.

For the record, it is an overcast rainy day.

And it goes from this textured ripply shawl, to a true lace shawl.  And like the Grinch’s heart, it can grow a few sizes too.  You does not need to be super fancy pants to achieve a good block, though to be honest it may help; I don’t know.  I just use towels and Sewing Pins and sometimes a few bits of old school acrylic yarn in the case where the edge is super loopy like this one.  The yarn is my blocking wire that stretches the loops out evenly so I don’t have to pin every single loop out.

There are several different types of lace repeats in this shawl

There are several different lace repeats in this shawl

This shawl was a bit difficult for me to finish… not because of the pattern, but because I wasn’t really making it with a giftee in mind and started to have good ideas about what I wanted to do with some of that Alpaca yarn I just got.

I didn't even finish trimming my cast on tail before this photo.... ¬.¬

I did not even finish trimming my cast on tail before taking this photo…. ¬.¬

But I don’t like to leave too many projects undone, so I finished it up, and it shall be folded up nicely to await the perfect person for it to go to.

That's right... I can fold half circle lace shawls AND fitted sheets.

I can fold half circle lace shawls AND fitted sheets.

Knitting with recipient in mind is a huge motivator for me, but sometimes you find you need to use your yarn and just knit something, and in the long run it seems to work out alright.

There are no Resolutions in this post, only ideas.

I don’t really make New Years Resolutions… more because people seem to think its a great thing to think of and then don’t take them all that seriously.  So I always have ideas and things I want to do and I do list them out as goals.  In 2012 it was a new Christmas Stocking each month from January to October with a goal on selling them.  I exceeded that plan in the crafting department, but I wish I’d done a bit better in the selling.  In 2013 it was sweaters, gloves, and working on my Star Quilt.

Well I did get the Sweaters part done… I made 3 this year.

I didn’t get any gloves made and the only mittens were for a 6 month old which didn’t really have separate thumb holes so I am not counting them towards the original goal, and not much work on my star quilt so those will just have to move into 2014.

Instead I tackled some lace shawls.

And doubled the amount of quilts I’ve made with four more. (BONUS: A Christmas gift of a quilted table set that I designed and hand appliquéd)

I also made up some great plushies, custom curtains and finished my first ever double knit scarf… so there was certainly quite a bit going on in 2013.

So now its time to think about all I want to achieve in 2014….

I have six quilts on my list this year!

  • A movie inspired gift quilt (lap size)
  • An Art Quilt (3-4ft square) Inspired by one of Ben’s favorite Artists
  • A Commissioned Baby Quilt
  • My Star Quilt (Back again! – King size)
  • A Christmas Cathedral Window Quilt
  • An as yet to be determined 2nd quilt for the family room.  Ben loves our VideoGame quilt, but thinks there should be a second quilt, because after all there are two of us.

In the knitting front I’ve got some other unique projects planned.

  • A Scarf and Shawl from my wonderful new Alpaca yarn!  I’m debating making my own patterns for these, but we shall see!
  • Gloves are still on the list!  I’ve already got the conductive thread to make them Smart Phone capable!
  • I’m going to tackle a second pair of socks.  I think with my skills I’ve worked on I might be able to do some patterns that won’t make me so bored by sock #2 (aka Second Sock Syndrome)
  • I’ve got a few more shawls planned.  Including one bird inspired based on the Stellars Jay
These Jays from the PNW are vibrant Blue and Black!

These Jays from the PNW are vibrant Blue and Black!

  •  I’d also like to tackle Brioche stitch as a new stitch this year.  Perhaps I’ll use up my “Action Green” from the Seahawks Stocking on that.

So its a bit of a list looking at it all at once… but if I can tackle 3 sweaters, 4 quilts and learning so much about lace in a year… I out to have a good start on some of these… RIGHT?