Bad to Worse and Back Again!

I know I mentioned in my last post a teaser about a knit project, but for reasons that will be explained later (real later not end of post later) I needed a break, and so I am going to skip back a bit to follow up on an item from The Good, The Bad and The Brioche.

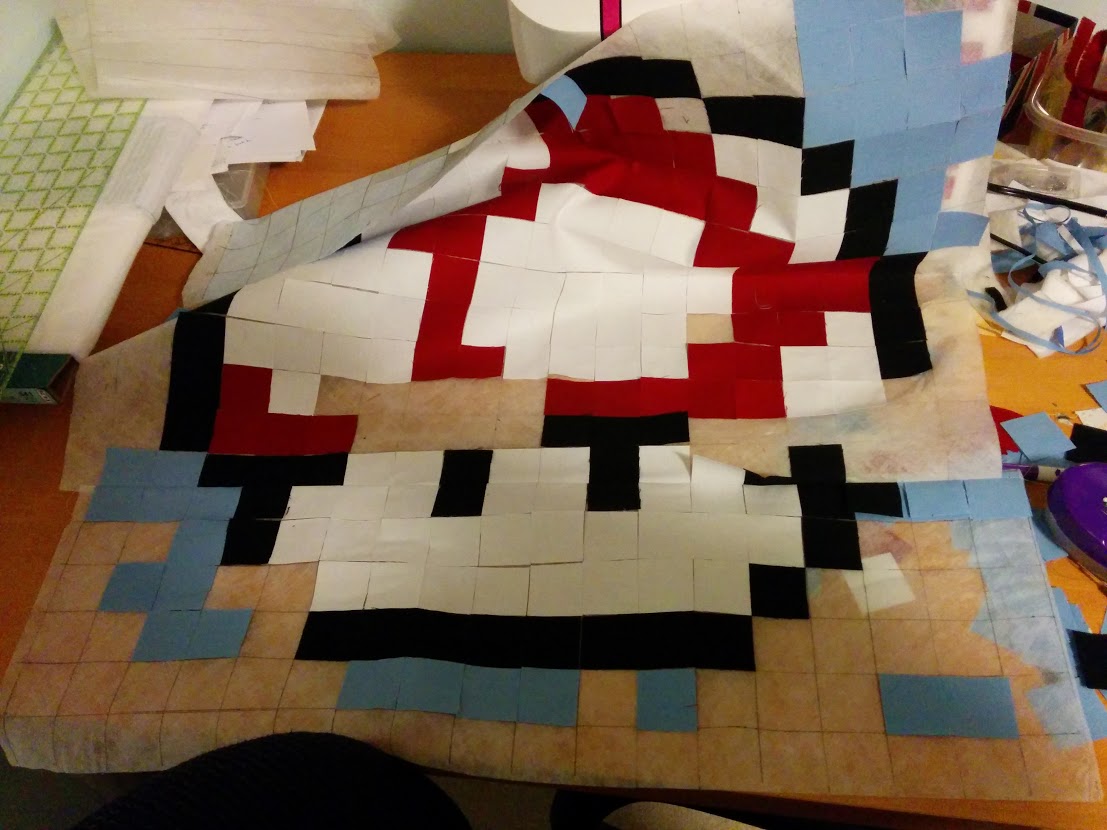
You may recall my commentary on how I bought the wrong interfacing and was attempting to forge ahead anyway with my Mario Mushroom quilt along block.  Well I did get my first seam in… the one where I was joining together the two bits with interfacing to make one giant square.  And then THIS happened:

Do you think it gives more or less life if its been sliced, diced or julienned?

Do you think it gives more life or less life once its been cubed, sliced, diced or julienned?

So clearly my prior plans were not going to work and so I paused my quilting game and ordered one of the recommended interfaces instead.  I ordered online as its never enjoyable to drive 30 minutes just to see if they have what you need.  First there was an issue with the order amount, then there was snow in Georgia that delayed the order but eventually I did get at least a good portion of my interfacing.

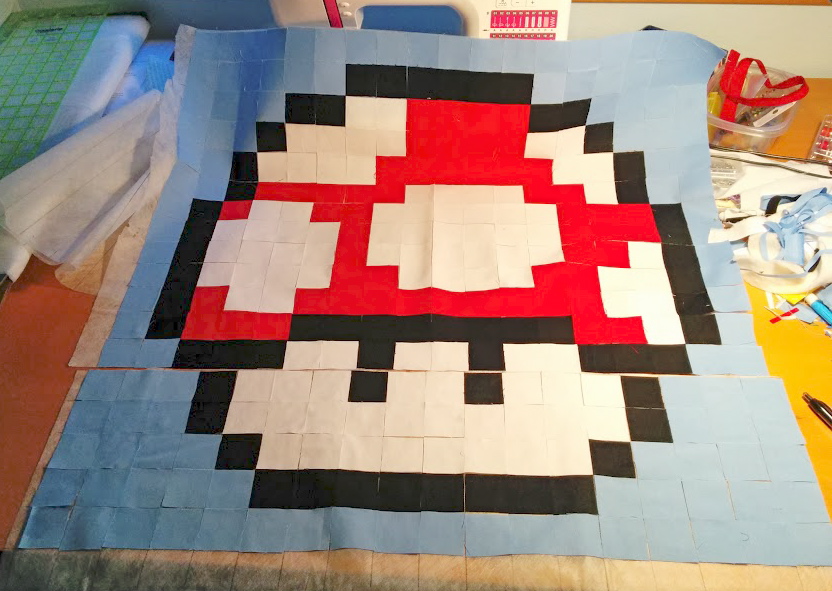
So I carefully laid out all my small squares (they are 1 1/2 inches) onto the new interfacing.  Bonus being that this new kind was wide enough for a whole block of them!  And then you iron them down.. and begin the seams.  I started with the horizontal.

Twilight Zone now controls the horizontal.

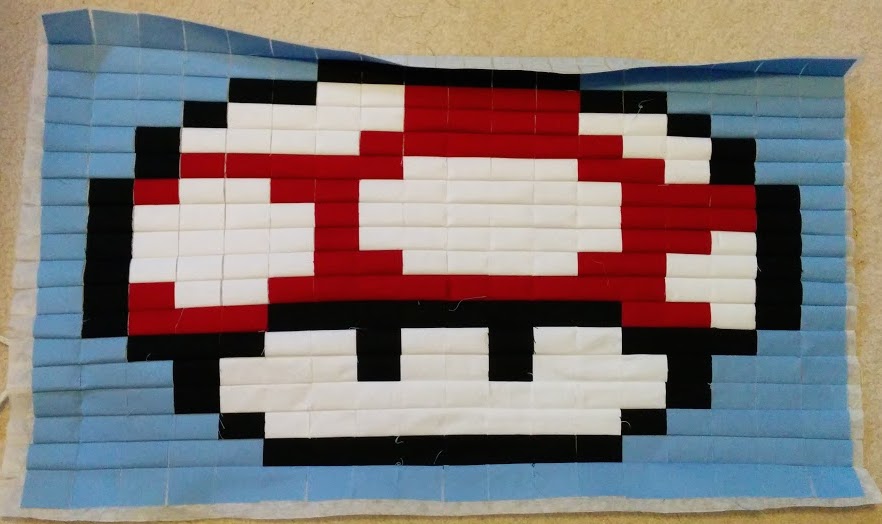
We will control the horizontal.

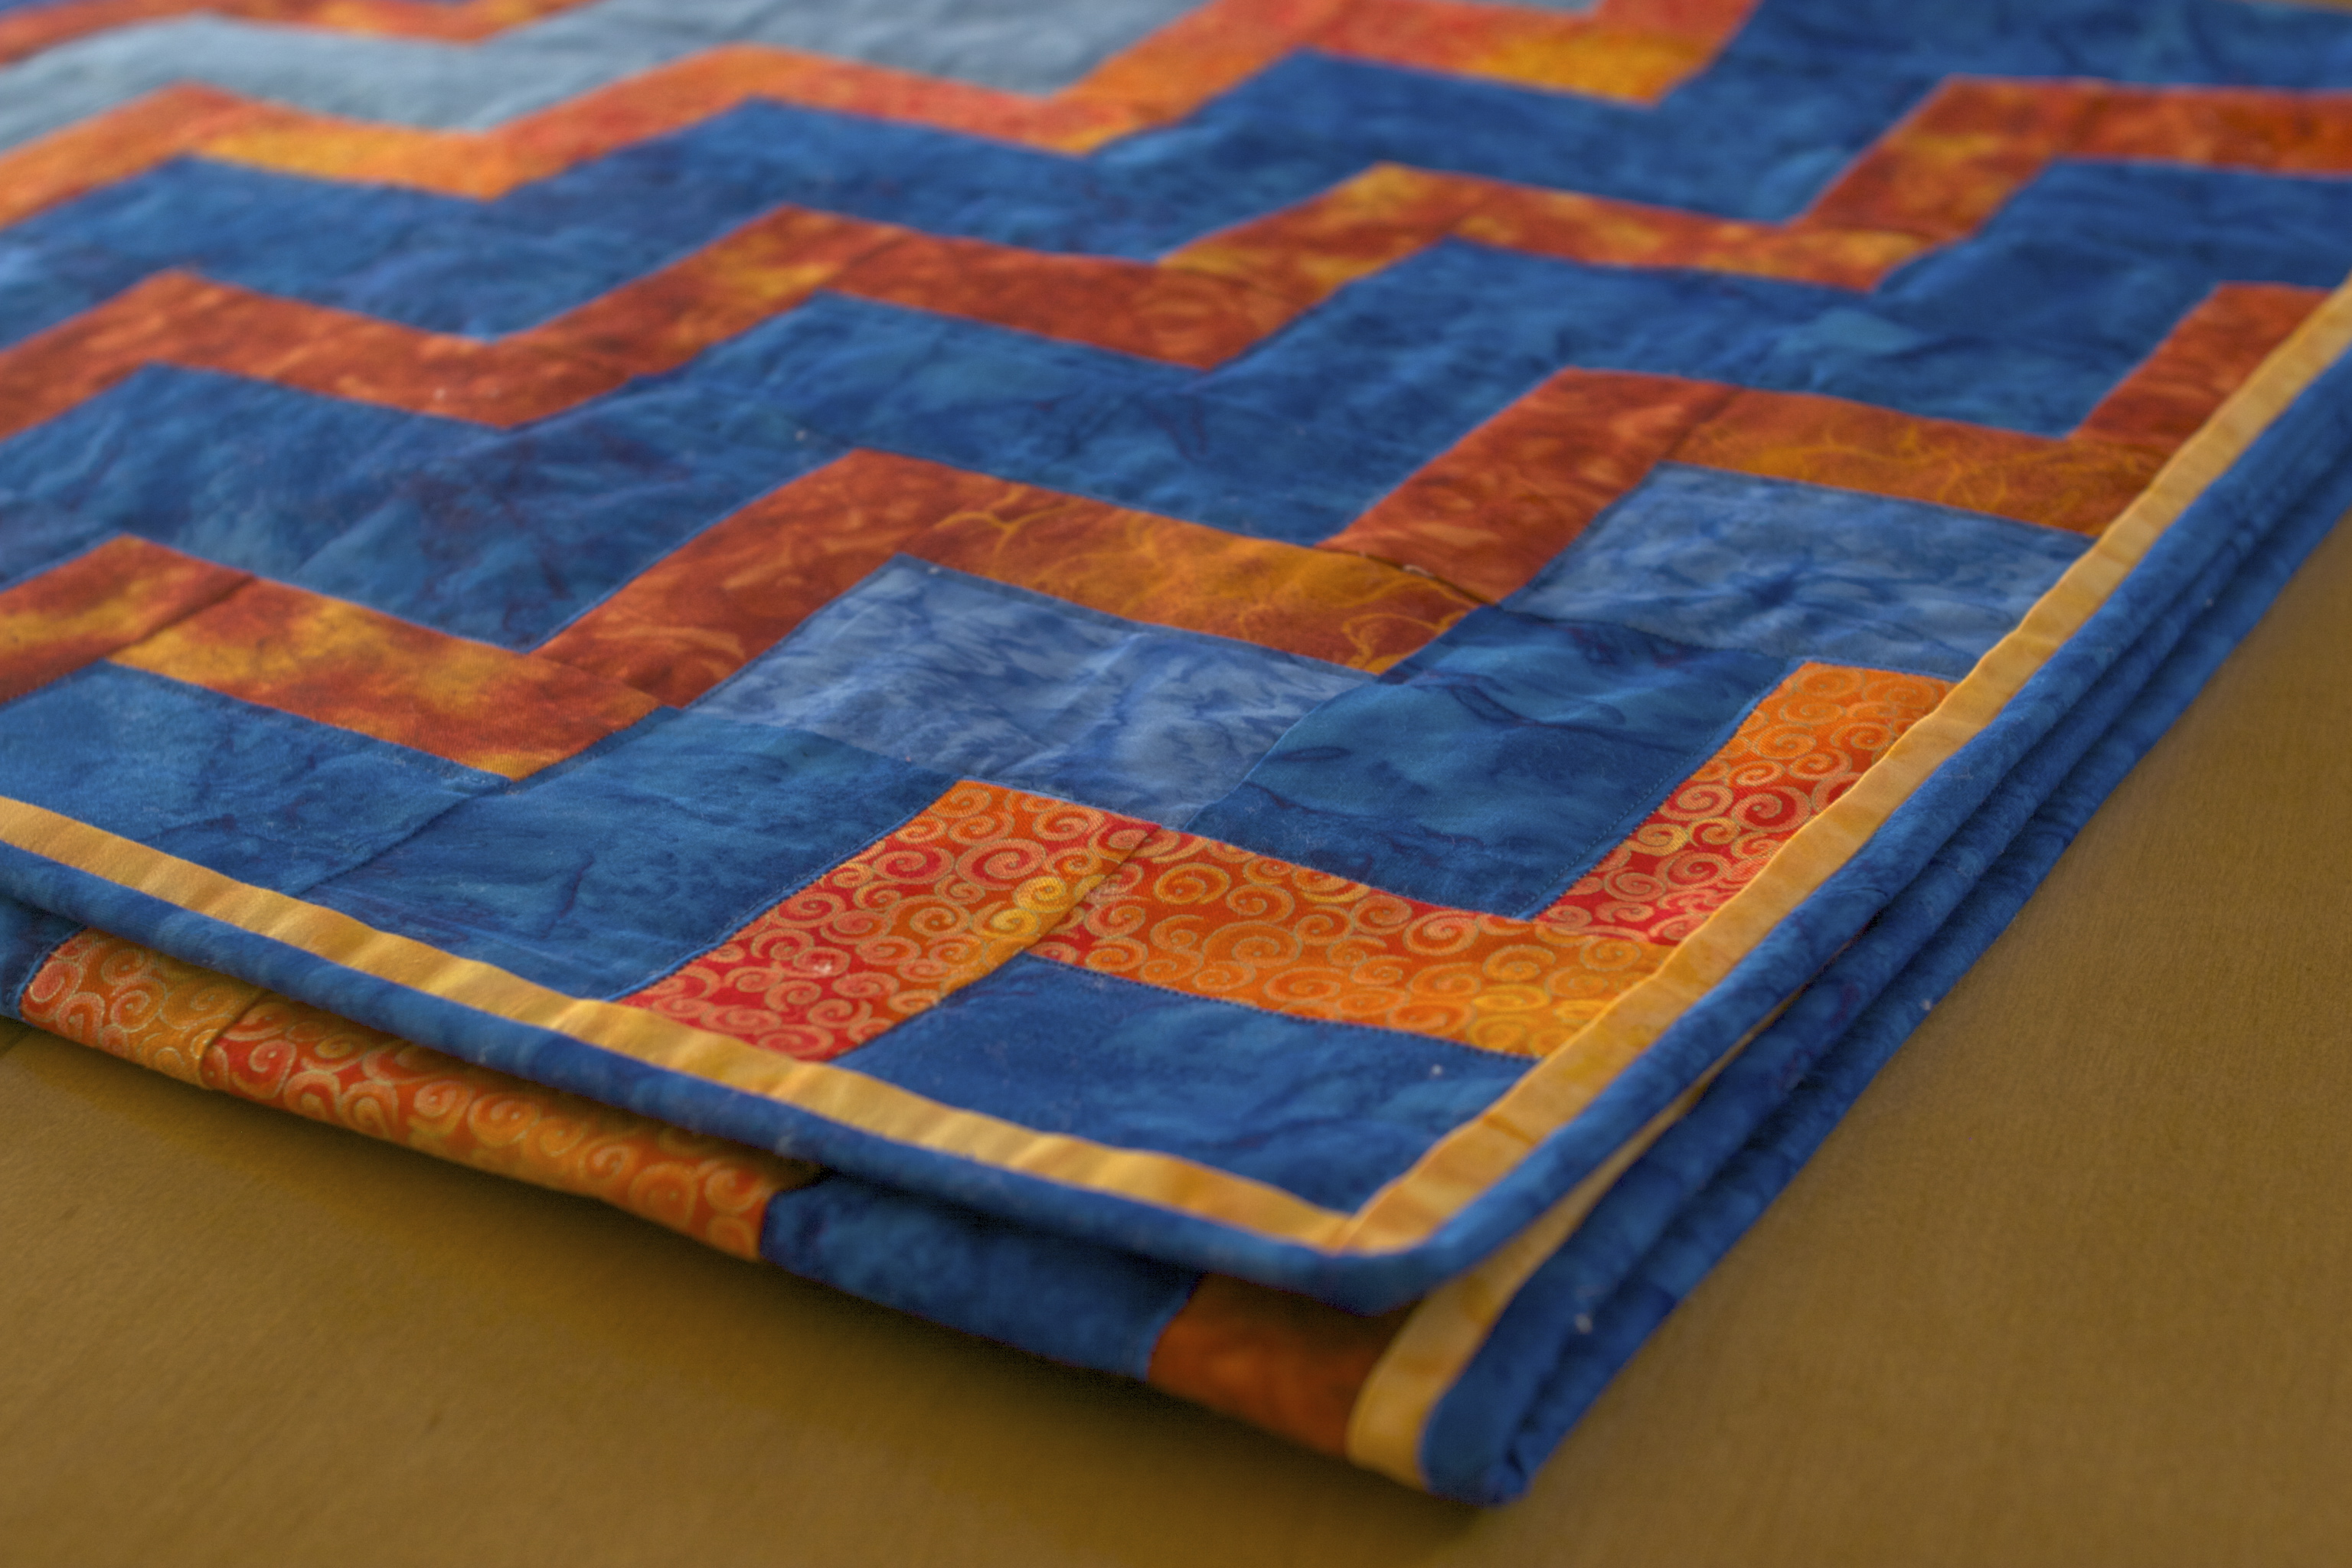
Now I did find a couple places near the edge where I didn’t do as good of job with my ironing where the squares came loose, but that’s my own user error and I can fix that going forward.

Next you start seaming the Verticals.

...and the verticals.

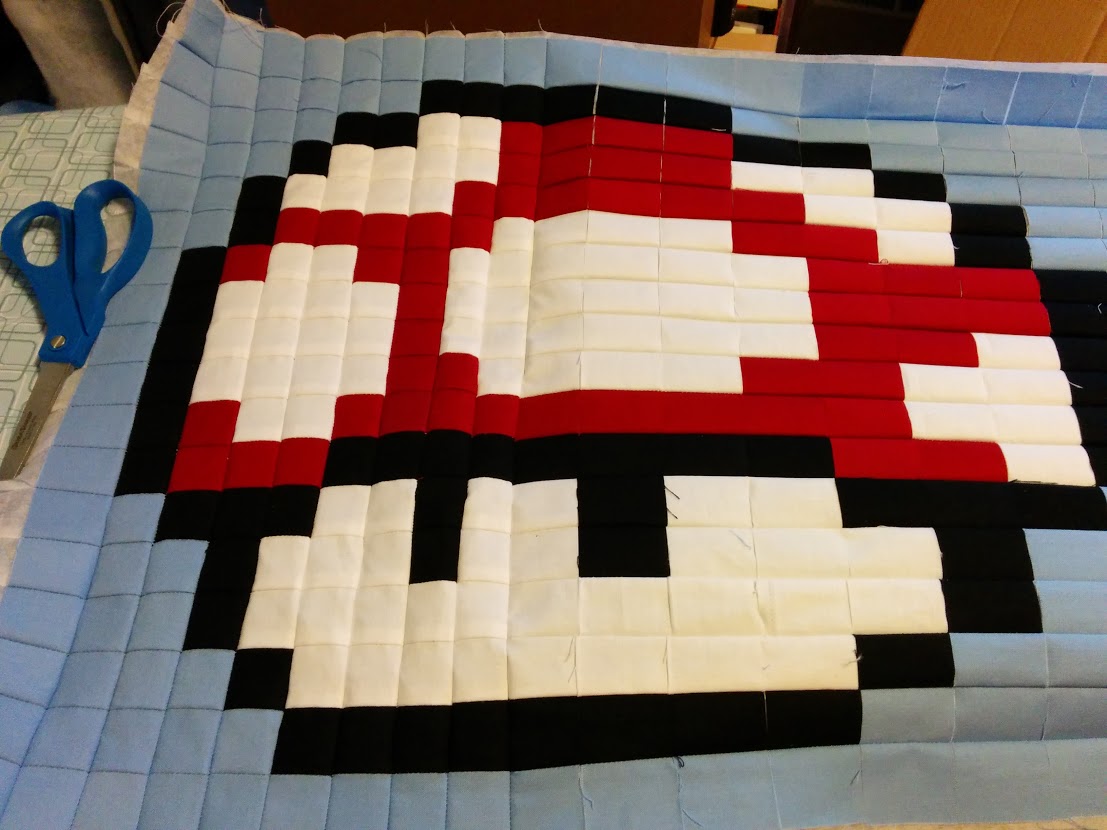
We will control the vertical.

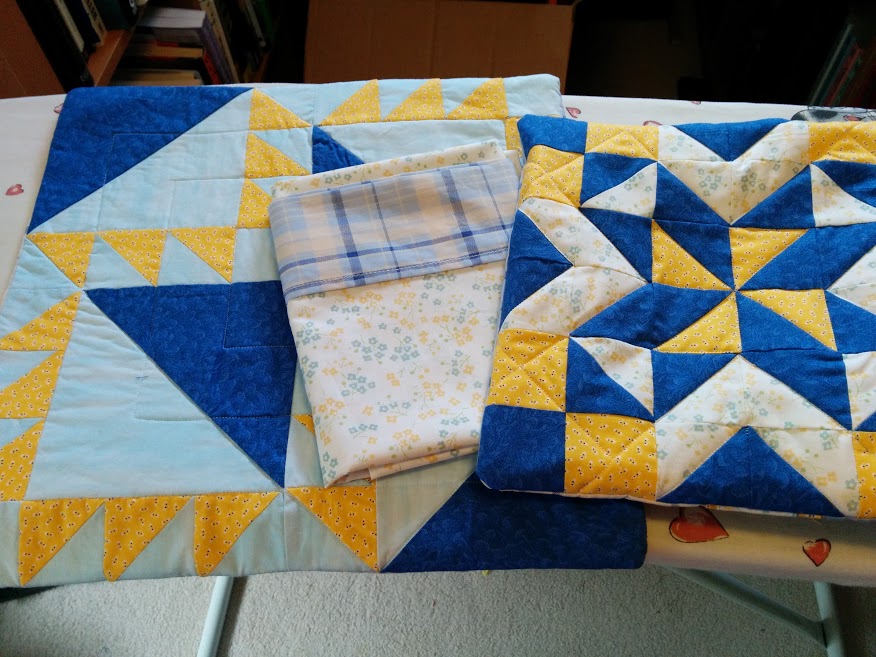
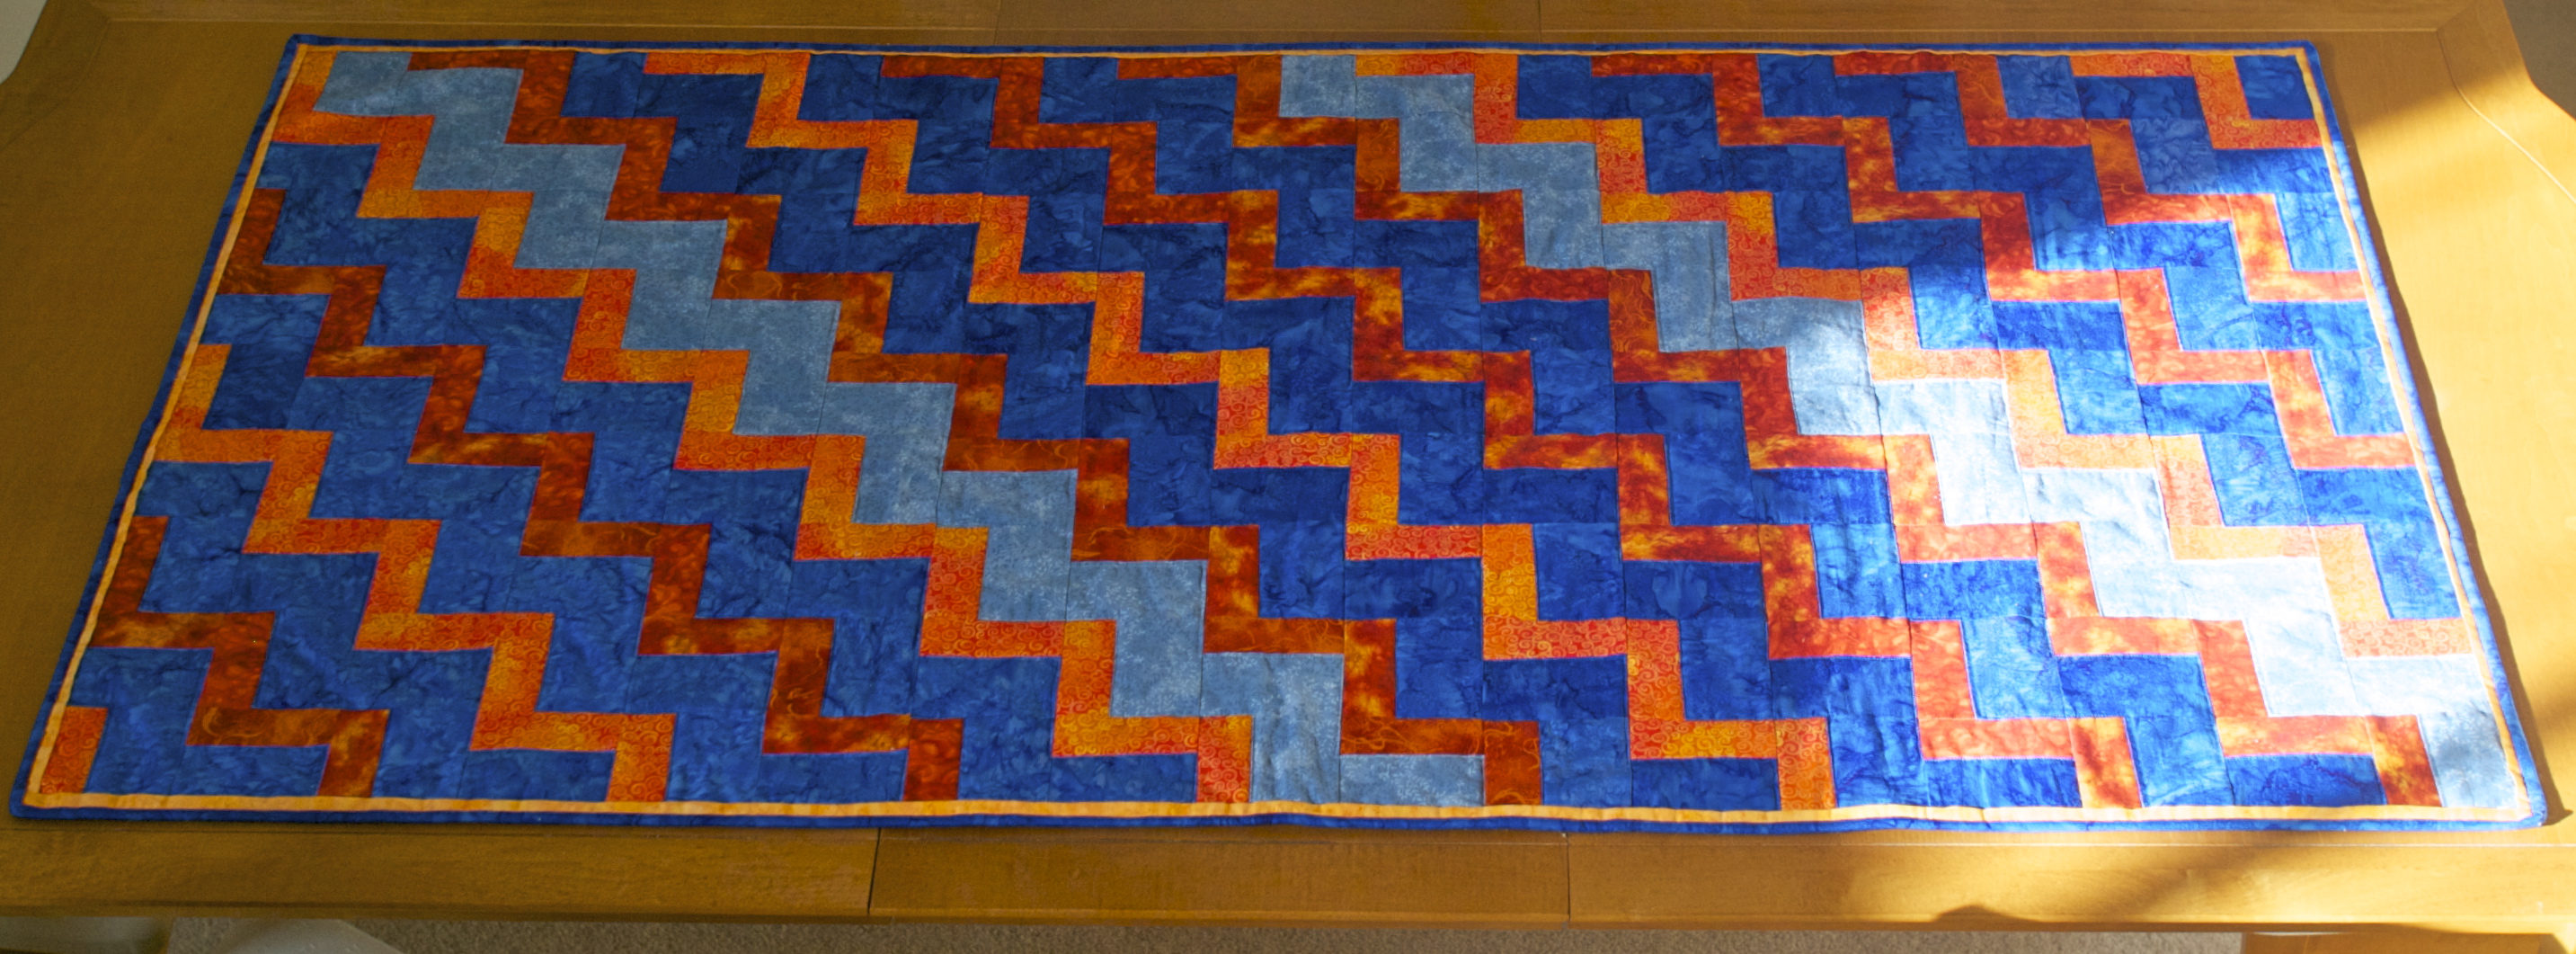
And eventually you end up with one 18 inch square Mario Mushroom pixel block.

Its a me, Mario!

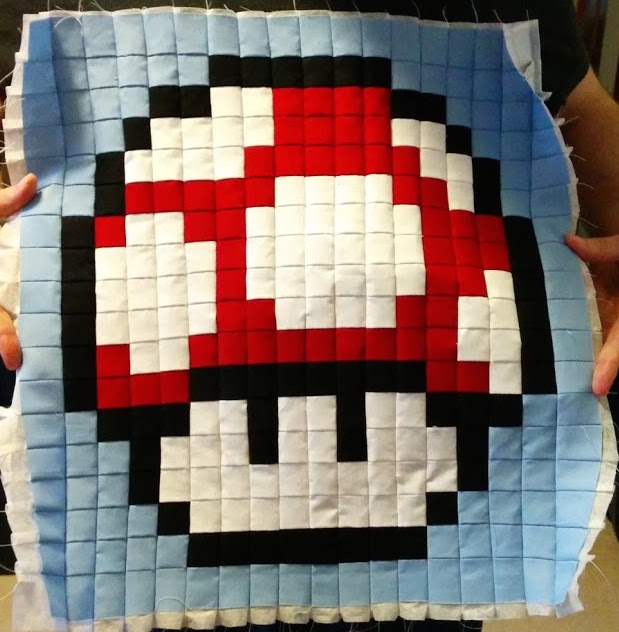
Until next time on… the Quilter Limits!

One thing I really like about this method is that all the seams line up just so nicely!  I only wish I didn’t feel like I was 2 months behind on the Quilt-A-Long Project.

The Good, The Bad and the Brioche!

The Good

Thus far this month, I’ve tackled a few smaller quilting projects.  One of which started out as a simple conversion of a bedskirt into a set of valances for Dale (of the Sunflower Dresden quilt fame).  But then I had fabric left, and if you do any kind of scrappy quilting that you can’t let so much as a perfectly good 2 inches of fabric go to waste, let alone any amount larger than that!

So I made a normal pillow case, trimmed in “valance plaid” and then I had more fabric so I made a few quilt block decorative pillows too.

Three pillowcase fronts.

Three pillowcase fronts.

The blue and yellow floral is new, but the dark blue and yellow are scraps from her sunflower quilt, the light blue from my first quilt.  Both smaller pillows are backed in her “valance plaid” to help tie the whole ensemble together. The inside pillow forms were made from some of the plain white that was a part of the bedskirt.  So all told I bought a yard of fabric, and ended up with 3 pillows, 3 valances and I still have a smidgen left.

Smaller pillow features my first ever button holes on my sewing machine too!

Smaller pillow features my first ever button holes on my sewing machine too!

The Bad

First off, I decided to join in a Quilt Along (QAL) with an online group.  (Details here) Now the joining wasn’t the bad part; its probably more of the good part since I don’t belong to a quilting guild or tend to get very social with my knitting and quilting.  But… the shop was out of the recommended interfacing, and the line was forming behind me at the cutting counter so in the words of the third knight in the Temple at the Canyon of the Crescent Moon, I chose poorly.  I chose a non-fusible/non-sticky kind, and its too narrow to do a whole block at a time.  I am attempting to forge ahead with some spray adhesive to see if I can make it work.  Thus far I’ve laid out the first block:

Here's a photo while I was waiting for the adhesive to dry.  You can see where I will need to seam the two sections together.

Here’s a photo while I was waiting for the adhesive to dry. You can see where I will need to seam the two sections together.

Like most of my quilt projects, I tend to take several cell phone photos of it as a work in progress and post them in an album.  Which you can check out here.  Wish me luck!  I might just need it.

In other mixed good/bad news, I did forge ahead with three more stars on my giant star quilt.  I am not super thrilled with how some of the points came out, and was feeling kinda crummy about it.  I do think the later pillow project actually helped, as it has similar cuts and came together very well.

A Green and two blues

A Green and two blues

The Brioche!

A while back I fell in love with a certain pattern for a shawl on Ravelry that uses Brioche stitch.  So this year I told myself I was going to learn.  And with the help of some left over Seahawk Action Green, I started with a nice beginner brioche scarf.

Brioche doesn't look like it has a wrong side.  Just a side of a different color.

Brioche doesn’t look like it has a wrong side. Just a side of a different color.

And so just before the Seahawks finished up with the 49ers, I finished up with my Brioche Scarf!

The tails are done in single color.

The tails are done in single color.

Now I just need to find the yarn I want for the shawl project and I’m all set.  I’m looking for a spring green  for one color and autumn spice for the other.

There are no Resolutions in this post, only ideas.

I don’t really make New Years Resolutions… more because people seem to think its a great thing to think of and then don’t take them all that seriously.  So I always have ideas and things I want to do and I do list them out as goals.  In 2012 it was a new Christmas Stocking each month from January to October with a goal on selling them.  I exceeded that plan in the crafting department, but I wish I’d done a bit better in the selling.  In 2013 it was sweaters, gloves, and working on my Star Quilt.

Well I did get the Sweaters part done… I made 3 this year.

I didn’t get any gloves made and the only mittens were for a 6 month old which didn’t really have separate thumb holes so I am not counting them towards the original goal, and not much work on my star quilt so those will just have to move into 2014.

Instead I tackled some lace shawls.

And doubled the amount of quilts I’ve made with four more. (BONUS: A Christmas gift of a quilted table set that I designed and hand appliquéd)

I also made up some great plushies, custom curtains and finished my first ever double knit scarf… so there was certainly quite a bit going on in 2013.

So now its time to think about all I want to achieve in 2014….

I have six quilts on my list this year!

  • A movie inspired gift quilt (lap size)
  • An Art Quilt (3-4ft square) Inspired by one of Ben’s favorite Artists
  • A Commissioned Baby Quilt
  • My Star Quilt (Back again! – King size)
  • A Christmas Cathedral Window Quilt
  • An as yet to be determined 2nd quilt for the family room.  Ben loves our VideoGame quilt, but thinks there should be a second quilt, because after all there are two of us.

In the knitting front I’ve got some other unique projects planned.

  • A Scarf and Shawl from my wonderful new Alpaca yarn!  I’m debating making my own patterns for these, but we shall see!
  • Gloves are still on the list!  I’ve already got the conductive thread to make them Smart Phone capable!
  • I’m going to tackle a second pair of socks.  I think with my skills I’ve worked on I might be able to do some patterns that won’t make me so bored by sock #2 (aka Second Sock Syndrome)
  • I’ve got a few more shawls planned.  Including one bird inspired based on the Stellars Jay
These Jays from the PNW are vibrant Blue and Black!

These Jays from the PNW are vibrant Blue and Black!

  •  I’d also like to tackle Brioche stitch as a new stitch this year.  Perhaps I’ll use up my “Action Green” from the Seahawks Stocking on that.

So its a bit of a list looking at it all at once… but if I can tackle 3 sweaters, 4 quilts and learning so much about lace in a year… I out to have a good start on some of these… RIGHT?

The Stockings were Hung….

This morning I woke up a good hour early, and rolled over to peek out the window to gauge the time and…. snow!  Like a good inch or so, there was snow on the ground and the tree branches.  I was so excited I couldn’t go back to sleep!  I love snow… so much that relatives several states away will call to tell me when they get their first snows of the season.

But we were on stockings.  Ben and I have stockings… we hang ours on the knobs of the china hutch.  Its not that we don’t have a fireplace, with mantle, but we don’t have those stocking hooks… and frankly the way I try to stuff them its probably good that I can pull out the drawer below for added stability sometimes!

While I did not make quite so many stockings this year, Ben and I signed up for the Redditgifts Secret Santa Exchange this year and I knew I wanted to give our giftees some custom Christmas Stockings full of holiday cheer.

My giftee collects vintage hand fans.  So I thought a modified Grandmother’s fan design would be appreciated.

Stuffed so full I couldn't even fit that last gift in!

Stuffed so full I couldn’t even fit that last gift in!

Ben’s giftee really liked the Seattle Seahawks, which means I know have half a skein of “Action Green” yarn in my stash:

The Hawks are doing pretty good this year!  Up to 12-2

The Hawks are doing pretty good this year! Up to 12-2

And I did indeed make sure to put 12 feathers on the heel and cuff….

The back of the Hawk's stocking featuring the rest of the wrap around design.

The back of the Hawk’s stocking featuring the rest of the wrap around design.

I do hope they like all their gifts, and as with the last gift exchange,  (Which was Star Trek in case you forgot!) I will update this post with any response from our giftees.

Meanwhile, my Santa was really quite on the ball… she has already sent me a great new knitting book called Woodland Knits.

Thanks again my Santa!

Thanks again my Santa!

There are some adorable patterns in there to give me lots of ideas in the new year.  I say the new year because this week I was all about a pair of commissioned custom StarCraft2 Scarves.  And I’ve cast on the second of my sleeves on my Spoke Sweater.  So between the housekeeping and cookie making and early Christmas having…. I am knitting like a made fiend to see if I can’t get it done to wear Christmas Day.  

Here’s a quick preview of the main body so you can see how far along I am:

Just needs some seaming, sleeves and a good blocking!

Just needs some seaming, sleeves and a good blocking!

UPDATE!  My Secret Santa Giftee received and liked her gifts!

And so did Ben’s Giftee (who posted a whole album – click the title)  Ben also posted what he received here.

A Sunflower State Retirement Frame of Mind

I have been holding onto this post for over a week… and all the in progress photos too… because I am a secret agent quilter spy!  (Or at least that’s what I tell myself.)  For my 7th finished quilt, I wanted to celebrate an amazing woman, Ben’s mom, Dale.  (For bonus geek points, she is named after Dale Arden, Flash Gordon’s girlfriend.)

Dale has been working for the past 28.7 years with the Kansas State Department of Education.  And so round about mid-August I found a great tutorial on making Dresden Plate Quilts online that made me feel full of confidence that a Sunflower State retiree could actually have a sunflower Dresden quilt.  So off I went to get a Dresden ruler and my fabric palette.

I actually had the brown fabrics already.

I actually had the brown fabrics already.

And for the front of the quilt I made up 9 sunflower blocks.  Mine were 17 inch blocks, which sounds like a weird number, but actually with the borders came out to a nice 60 inch square lap quilt.

And here the front is.. in all its sunny glory!

And here the front is.. in all its sunny glory!

Now here’s why the spy parts come in…. I decided that this should be a secret project, but I wanted to tie in her work with the quilt… so I called her boss (ok I got the assistant to her boss) who patched me through to another co-worker that became my agent on the inside.  She hooked me up with a fine selection of photos, which I added to the back of the quilt.

This is also a good view to see how I did my quilting lines!

This is also a good view to see how I did my quilting lines!

The picture rail on the back brought the yellows and the blue from the front to the back.. and then a small pip on the front, brought some of the backing yellow forward.

I did get a bit lucky in places where I quilted through the picture rail.

I did get a bit lucky in places where I quilted through the picture rail.

I used the same basic method for making the center circles that is illustrated in the tutorial I linked above, to make the leaves on my itty bitty Dresden Quilt tag on the back:

With some creative folding presentation, front of a single square, and the tag got a highlight too!

With some creative folding presentation, front of a single square, and the tag got a highlight too!

I really do need to thank my agent on the inside.  The quilt was mailed on Monday, with expectation of arriving Friday in time for the party they were having.  For whatever reason on Monday I was thinking was an after work thing, and after a few more conversations… realized it was more after lunch in timing.  So the two of us were eyeballing that online tracking like it was overtime of the Super Bowl.  And then… it ticked over from “Out for Delivery” to “The Receiver’s location was closed on the 1st delivery attempt. A 2nd delivery attempt will be made.”  But my Agent on the inside (name withheld because she’s a secret agent… duh!) went above and beyond to drive out and meet the truck and take delivery.  I shall formally file a commendation in her agent personnel file.

Flower Power!

Flower Power!

And now for some technical specs, because as a newer quilter (this is number 7) I find them helpful.  I used up nearly all of my 1/4 yard of each of the yellow petals fabrics, of which I picked out seven different variations.  True 1/4 yards, not fat quarters there.  I also used up 1/2 yard of the dark green in just the lattice work on the front, not including the border. I had originally thought I would do 18-20 inch squares, so I had some blue left over of the 2.5 yards I bought.

Additional Photos in the progress gallery here.

Happy Birthday to me~ A Gift made from part of a Tree!

Perhaps you will recall my friends I gave the orange and blue quilts to?  (If not see here and here)   Well, “Mr. Endless Stairs” enjoys woodworking, and frankly he’s pretty amazing at it.  Today he brought me a gift I totally happy danced over.

My very own Quilt Rack:

Such a nice finish!

Happy Dance not shown.

Now I’m having a difficult time deciding where I want to put it… for now its in the family room, with my first ever quilt on it:

PIkmin 3 is out tomorrow fyi!

PIkmin 3 is out tomorrow fyi!  And those aren’t wrinkles.. those are snuggle impressions!  (ok, they ARE wrinkles but I couldn’t wait to take pictures!)

And here’s a couple more glamour shots….  I will have a post sometime in the not too distant future where you can see that light blue one in the back better, but that’s for another day… today its all about the wood underneath!

Yes... its overcast here near the Seattle side.... what makes you ask?

Yes… its overcast here near the Seattle side…. what makes you ask?

And a fine top down view with some new fabrics from the new local quilt shop:

I think the blue one looks like Frank Lloyd Wright stain glass, and the green is more Tiffany style

I think the blue one looks like Frank Lloyd Wright stain glass, and the green is more Tiffany style

And while I said it in person, I shall say it again to all and sundry…. Thanks!  It really is an amazing gift.

To Boldly Go…into Star Trek Quilts

While I could bore you with the details of how Ben suggested we do the Star Trek Reddit gift exchange, and how I am extremely nervous about gifting strangers handmade gifts because I’m afraid they will be seen as the golden macaroni pencil cup.. I think instead I will just post the silly little Captain’s Log Story I sent with my giftee’s quilt (and of course photos!).

Disappearing 4 patch in Trek, Command Gold, Science Blue and Red Shirt

Disappearing 4 patch in Trek, Command Gold, Science Blue and Red Shirt

B Captain’s LogB

Stardate 2264.2

While on our way to check on one of the outlying colonies, Mr. Spock noted the presence of several indicators of intelligent life in an adjoining star system and I’ve decided to check it out.

Stardate 2264.3

The Enterprise has been stopped at the 4th planet in the System. Mr. Scott assures me that the engines are all online but that “She just won’t go!”

Meanwhile, we have been hailed by a being who says her name is Materialanna, representing the Textilian Homeworld. They are claiming we have caused a rent in their space-time fabric and demanding we sew up a suitable patch.

Spock is concerned about the inconsistency of a species that seems to view space-time as a fabric, and yet has the ability to stop a starship.

I have decided at this point to go along with their quilt patch plan, and if nothing else, that will hopefully give Mr. Scott the time he needs to figure out how to get the Enterprise moving again.

Stardate 2264.6

I assigned Dr. McCoy to the seaming of our patch fabric. He mentioned something about “Doctor Not a Seamstress” and “Hospital Not a Sewing Circle!” but after reminding him he had the most stitching experience of anyone, he agreed to take up the task in one of the storage bays.

Quilt #5 is alive!

Quilt #5 is alive!

Stardate 2266.8

The quilt patch is complete! The Textilians have accepted our patch piece and assure us that it will be sent to the proper place and time. Mr. Scott is reporting full function of the Enterprise. Inexplicably, Mr. Spock has noted that all signs of life in this system have ceased to register on his scope.

a

And I made one for Ben's giftee too.  He helped with the layout, and even ironed once!

And I made one for Ben’s giftee too. He helped with the layout, and even ironed once!

Star Trek Into Darkness!  KHAAAAANNNNNNNNN!!!!

6th Quilt…… KHAAAAANNNNNNNNN!!!!

These two babies are already wrapped up and in the mail.  Normally I wouldn’t post gift items until they were received, but in this case the giftees do not have any idea who is gifting them so it is all still a mystery.  These two are backed with a classic trek fleece which was a first for me and I think they turned out pretty well.  I will update with a link here if they post about getting them.

UPDATE:  Ben’s Giftee posted about getting her items.

UPDATE #2: After no tracking updates since Tuesday… my giftee got his gift!

Quilt 4: Endless Stairs Fiery Companion

A while back you may remember I bought a bunch of orange fabric and made some friends a Cracker Quilt.

Cracker Blocks arranged in a 4 color woven pattern.

The Cracker Quilt

Well because I am kind of new to the whole thing and worried about things like running out of fabric or butchering my fabric in some fit of miscutting… I overplan in the fabric department.  So for my fourth quilt I didn’t actually have to buy any new fabric at all!  I wanted something that would look like a companion piece to the cracker quilt… so I settled on a pattern called Endless Stairs.

And in the tradition of not spoiling the surprise I bring you… the Endless Fiery Stairs Quilt:

Front... with all the stairs!

Front… with all the stairs!

For the Back… I wanted to do something a bit different.  I have been admiring some of the newer quilt designs where the quilter pulls in the design elements or embellishes the backside in a complementary way.  I went with a framed chevron pattern.

Echoing the front but done with angles instead of rectangles

Echoing the front but done with angles instead of rectangles

I am a believer in trying new things.  They won’t always be a success… but not every failing is a failure.  For the back piece… I pieced my orange and blue middle stripe first and then realized I hadn’t sewn in the blue triangles between the points.   WHOOPS!  I did actually manage to pull off piecing those triangles in there.. but it was a lesson in not getting too focused in and to take your time making sure you’ve seen the whole bigger picture.

Here's an extra detail shot, especially since Ben got the new cards for the nice camera!

Here’s an extra detail shot, especially since Ben got the new cards for the nice camera!

And btw… I still have quite a bit of orange left!

The dark orange is actually a combination of 3 different fabrics.

The dark orange is actually a combination of 3 different fabrics.

What to expect in 2013

Well last year I set myself the goal of one Christmas stocking a month from January to October and it went pretty well.  I sold a few of the stockings, and hopefully someone will take advantage of this coupon code “InWithTheNew” and save themselves 25% on those I have left in the etsy shop!

So this year  I thought it might be good to set myself some of those crafty goals again… so here’s what I know I want to do in 2013:

I’ve accepted a commission on 18 itty bitty red birds for one of my aunts Christmas Trees.  The pattern is available on ravelry, my only difference is that instead of yarn I used size 5 DMC floss on what I think are my size 00 knitting needles (I swear I thought I was going to bend those things as I was going along!)

This tree soon to be populated with a flock of red birds

This tree soon to be populated with a flock of red birds

I’d also like to tackle my first sweaters.  I want to make one for myself and one for Ben.  For him, I’ve picked out my pattern… and its aptly named… Ben!

I'm gonna make a Ben for my Ben so he can Ben in his Ben!

I’m gonna make a Ben for my Ben so he can be Ben in his Ben!

On the Quilting front, I’ve picked fabric and cut for my first square on the grand King sized Quilt I want to make for our bed:

I picked up a couple of these Jelly Rolls at the Labor Day Sale and then did the math on downscaling some star blocks to fit the roll cuts

I picked up a couple of these Jelly Rolls at the Labor Day Sale and then did the math on downscaling some star blocks to fit the roll cuts

This is my first Block cut and just starting to piece.

This is my first Block cut and just starting to piece.

Because its going to be so big, my plan is to piece it and then take a class and quilt it on a long arm machine at one of the local(ish) quilt shops!   If you want to follow along, just as in prior cases… there is an album started for this one.

And lastly, but certainly not least… I want to start making gloves and mittens in a similar style to last years stockings.   Which means lots of fiddling until I find what works best in that arena.

So… Wish me luck!

Christmas Kitchen Gifts to Give

Giving homemade gifts is one of those things that you either pull off with amazing confidence or immense trepidation.  For me its usually trepidation.  I’m very aware of the gold macaroni effect that some homemade gifts carry with them.  So braving all that and casting into the ether of “well if they don’t like it they can use it as oil rags!” I present some Christmasy Kitchen gifts  (I’ve already gifted these, so its safe to share!):

One set was 2 quilted Hot Pads, A knit dishtowel, dishcloth and scrubby

One set consisted of  2 quilted Hot Pads, A knit dishtowel, dishcloth and scrubby

Every item was different, and the knit items are simple knits done in Christmas colored cotton yarn.  I used King Charles Brocade , Double Seed StitchBasketweave Stitch, Grandmother’s Favorite Dishcloth, and just a pure garter stitch for patterns.   To make the scrubbies, cut a roughly 1 inch strip of tulle (and just eyeball it…. you won’t notice any imperfections.  My strips always turn out looking like they were cut by a 5 year old hopped up on espresso.) and knit as a second strand with your regular knit pattern.

My hot pads were all test quilt blocks, a 6 inch block and an 8 inch block.  In the photo above the smaller is a traditional 9 patch and a disappearing 4 patch block, both of these I just used stitch in the ditch method.

An Old Maids Rambler and a more traditional Four Patch Set

An Old Maids Rambler and a more traditional Four Patch Set.  The Rambler is just stitch in the ditch, the Four Patch has echo quilting on the larger bird solids, and diagonal on the smaller four patches.

IMAG0860

A9 patch with just 2 fabric colors, and a Variable Star.  I used echo quilting on the interior of the star, and quilted through the diagonals of the lighter fabric on the smaller square.

Each of my sets were joined by identical fabric choices for the backs.  I used two layers of batting and bound them by folding the larger backing material twice over to the front.  To get the mitered style corners, fold the corner in at a 90 degree angle before you fold in the sides.

Now I also included several batches of cookies, and tied my gift bags with some ornament seed cakes.  I got the seedcake recipe from this instructable that was designed for making a seed wreath.

My seed cake ornaments with their hanging loops.

My seed cake ornaments with their hanging loops.

What I did differently is that I used my cookie cutters, covered on one end with tinfoil as my molds.  I actually had a few more than these, specifically some snowflakes, but they were a bit fragile and didn’t make it, either from the removal from the cutters or from my attempts to add hanging holes.  So I’d suggest either pre-stringing your cakes, OR use a heavy nail as a hole making form within your seedcakes when you are forming them.   They are safe for feeding the birds, or you can use them on your tree!